


Is your first penetration test around the corner? Active Directory is a prime target for internal security pentests and is commonly misconfigured. The intent of this post is to provide a list of warm-up exercises that will remove some of the lowest hanging fruits from your Active Directory environment.
In this three part series, we will discuss the three most common Active Directory vulnerabilities we see when testing a client for the first time:
- NetBIOS Name Service (NBNS) and Link-Local Multicast Name Resolution (LLMNR) protocols in use
- Server Message Block (SMB) signing not required
- Plaintext passwords in memory
Fixes for these issues generally require a Group Policy Object (GPO) to be pushed to the domain and may sometimes require the system to be restarted. For each of these issues, we will explain how to test for the vulnerabilities using open source tools and outline steps to remediate the vulnerabilities.
NBNS and LLMNR
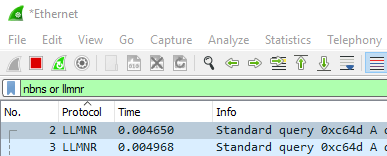
The first testing activity for an internal pentest is very often to monitor for these two protocols on the network. This requires network-level (Layer 2) access and can be monitored by using a packet sniffing tool such as Wireshark. After installing Wireshark and monitoring on the existing network interface, you should see a lot of packets scrolling through. To search for a specific protocol, you can type the protocol acronym in the search bar at the top of the screen.
So what makes the fact that systems are broadcasting NBNS and/or LLMNR protocols a vulnerability? Both NBNS and LLMNR are legacy protocols that primarily enable name resolution between hosts in a broadcast domain. If a Windows host fails a lookup for a hostname using DNS, the NBNS and LLMNR protocols will be used as fallbacks. The system will broadcast out to the entire network segment looking for the IP address of the hostname. In a perfect world, the hostname would respond to the request with its IP address, and the Windows hosts will be able to communicate.
Unfortunately, the world is not perfect and attackers can easily jump into the middle of this process. An attacker connected to the local network can use a poisoner tool, such as Responder, to automatically respond to NBNS and LLMNR requests. The response will tell the Windows host that the hostname belongs to an IP address controlled by the attacker. The Windows host will then send authentication credentials in the form of a Windows NTLMv2 hash to the attacker’s listening SMB server. This allows the attacker to capture Windows user password hashes that can be cracked offline or used in SMB relay attacks (which we will discuss in the next post in this series).
In order to prevent this type of attack, the best course of action is typically to disable both the NBNS and LLMNR protocols, as they are very rarely used for legitimate purposes in today’s environments. However, before taking these steps, it is important to review your environment to make certain disabling these protocols won’t break your business. We would recommend performing the steps on a small sample prior to doing so in larger environments.
Disabling LLMNR
LLMNR can be disabled using Group Policy on both local systems and across entire domains.
Local System
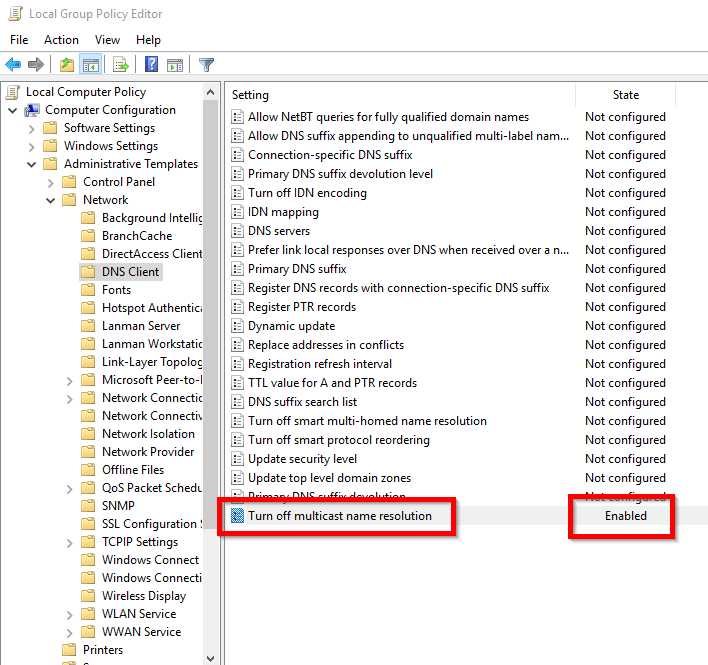
To disable LLMNR on a local system, use the Local Group Policy Editor (Windows 10):
- From the “Start” menu, search for msc
- Navigate to “Local Computer Policy > Computer Configuration > Administrative Templates > Network > DNS Client – Turn off multicast name resolution”
- Set the “Turn off multicast name resolution” policy to “Enabled”
- Reboot the computer and use Wireshark to validate that LLMNR was disabled
Domain Controller
To disable LLMNR across the entire domain, the policy must be updated from the domain controller:
- Open the Group Policy Management Editor for your Active Directory domain’s group policy
- Navigate to “Computer Configuration > Policies > Administrative Templates > Network > DNS Client > Turn off multicast name resolution”
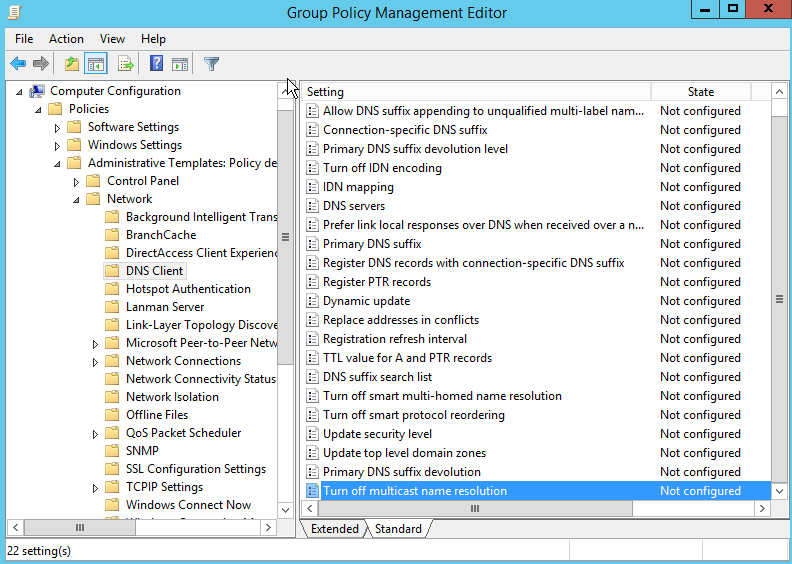
- Set the policy to “Enabled”
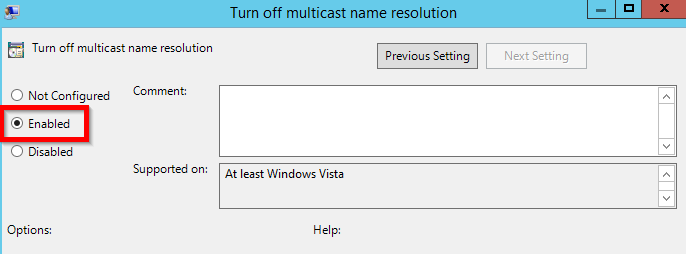
- Click “Apply,” then push the Group Policy out to your domain
- After giving time for the policy to update on the machines (and restarting the machines to be sure), use Wireshark to validate that LLMNR was disabled
Disabling NBNS
The configuration for NBNS for local systems is located within network adapter settings and also within a local registry key. If you will need to disable NBNS across a large number of devices, it is recommended to use Group Policy to push a startup script that edits each system’s registry key for the appropriate network interface. There is also an option on DHCP servers to disable NBNS when assigning IP addresses to systems.
Local System Network Adapter
In Windows 10, disable NBNS on a local network adapter:
- From the “Start” menu, open the “Windows Settings” page (gear icon)
- Navigate to “Network & Internet”
- Open “Change adapter options”
- Right click on the network adapter for which NBNS will be disabled
- Open the “Properties” menu
- In the “Networking” tab, select “Internet Protocol Version 4 (TCP/IPv4),” then click “Properties”
- In the “General” tab, click “Advanced…”
- In the “WINS” tab, select “Disable NetBIOS over TCP/IP”
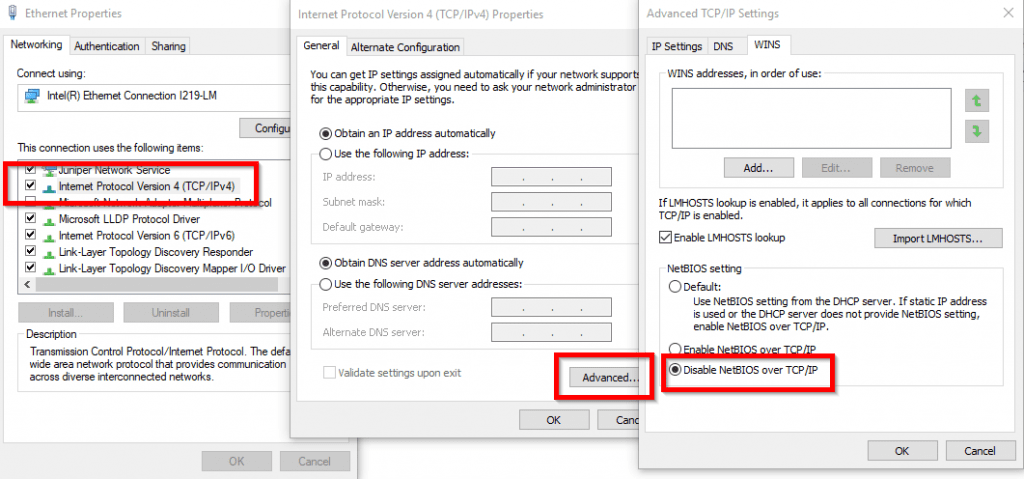
- A system restart might be required for the changes to take effect
- Use Wireshark to validate that NBNS traffic was disabled
Local System Registry Update
In Windows 10, you can also disable NBNS on each adapter through the registry:
- Open the “Start” menu and search for regedit to open the Registry Editor
- Navigate to HKEY_LOCAL_MACHINESYSTEMCurrentControlSetServicesNetBTParametersInterfaces
- For each of the interfaces on which you want to disable NBNS, edit the “NetbiosOptions” and change the value to “2”
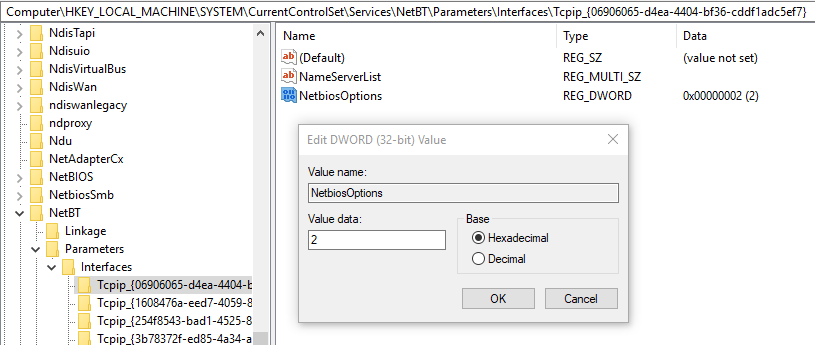
- To apply this change to all systems in a domain, create a startup script that makes the above changes, then push the startup script out to domain-joined computers using a GPO
- Use Wireshark to validate that NBNS traffic was disabled
Disable NBNS from DHCP Server
In Windows 2012 Server, you can also set up the DHCP server to disable NBNS when assigning IP addresses:
- Open the “Start” menu and navigate to “Administrative Tools > DHCP”
- Expand the appropriate DHCP server on the left configuration menu, then expand the “IPv4” option
- Right click on “Server Options > Configure Options…”
- In the “Advanced” Tab, select the “Vendor Class: Microsoft Windows 2000 Options” from the dropdown menu
- Check the box for “001 Microsoft Disable Netbios Option”
- Change the “Data entry” value for “Long:” to “0x2”

- Click the “Apply” button and validate that the option appeared on the “DHCP Server Options” page
- Systems that already have IP addresses assigned will likely have to renew the IP address lease to have the changes applied to each system
- Use Wireshark to validate that NBNS traffic was disabled
Wrapping Up
Disabling LLMNR and NBNS is an easy win for Active Directory security. If your environment is constantly adding new systems, it is important to continue to monitor for traffic using Wireshark. Maintaining a proactive approach to security will keep your team ahead of attackers. If your organization has any questions about how to better secure your environment, you can always contact Sikich’s team of cybersecurity experts for help.
In the second part of this series, we will discuss how attackers abuse the SMB protocol to relay authentication requests across the network.
This publication contains general information only and Sikich is not, by means of this publication, rendering accounting, business, financial, investment, legal, tax, or any other professional advice or services. This publication is not a substitute for such professional advice or services, nor should you use it as a basis for any decision, action or omission that may affect you or your business. Before making any decision, taking any action or omitting an action that may affect you or your business, you should consult a qualified professional advisor. In addition, this publication may contain certain content generated by an artificial intelligence (AI) language model. You acknowledge that Sikich shall not be responsible for any loss sustained by you or any person who relies on this publication.