


If you follow the Sikich blog, you might notice a reoccurring theme in my past couple blog articles – Exchange 2010.
- Microsoft Exchange On-Premise Coexistence Issues Related To Time
- Fixing Exchange Server Message Queue Error “451 4.4.0 DNS QUERY FAILED”
This blog wraps up the series as the very last step in that process of migrating from an old version of Exchange would be to uninstall any legacy Exchange 2010 servers that exist in your environment. The only recommended way of removing Exchange 2010 from an Active Directory environment is by uninstalling it from every server by using the Add/Remove Programs option in the Control Panel from the functioning Exchange 2010 servers themselves.
There is an alternate method that can manually remove the server from the directory by using ADSIedit; however, you should only use this as a last resort and under the guidance of Microsoft support or the like. It can be a good option when you are out of options.
We strongly suggest that after you have migrated away from the Exchange 2010 servers, either turn off the servers or disconnect them from the network (unplug network cables or disable the adapters) for a period of time. Doing this step will make sure that there are no remaining services the server may be providing to users (a few weeks should do it). Once you get the warm and fuzzy feeling that nothing has failed after the old servers are disconnected, it is time to schedule your uninstall of Exchange 2010 and either power up or plug back in the network cables.
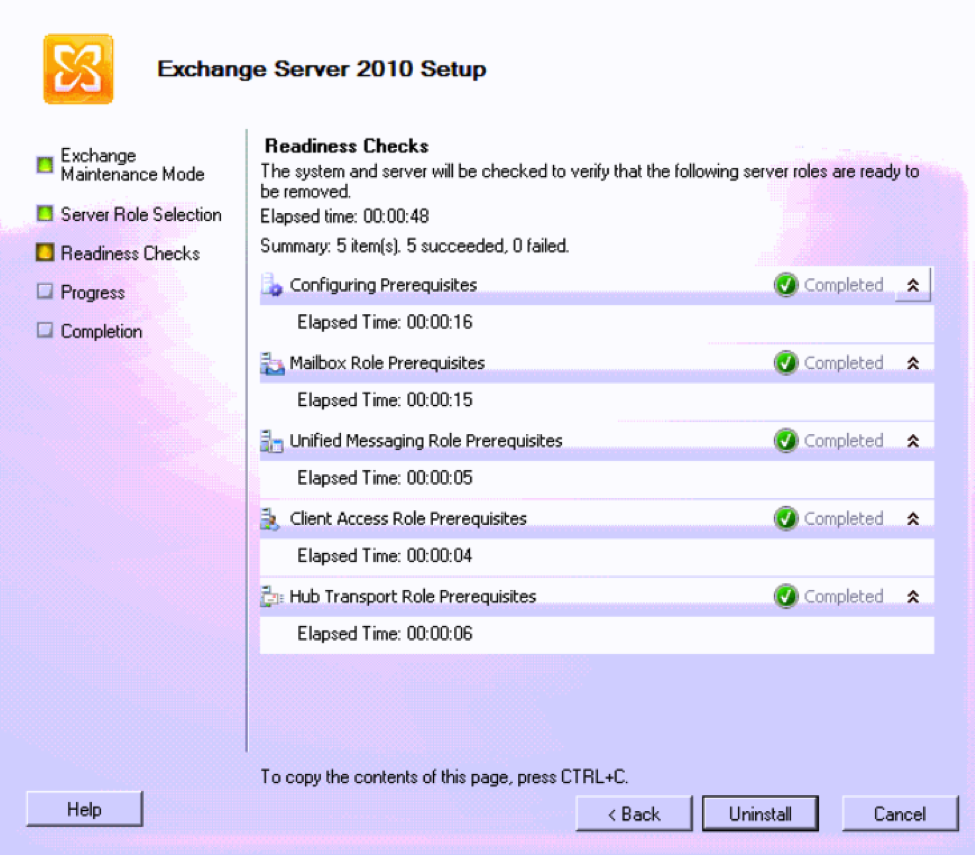
Always put your best effort in first to cleanly remove Exchange 2010 by way of removing through the Control Panel’s Add/Remove Programs section. When doing so, Exchange runs through Readiness Checks that will alert you to things that may be in place or misconfigurations that would prevent a clean uninstall.

In my case, I had the following issues reported to me from the uninstaller:
- This Mailbox server is responsible for generating an Offline Address Book. Removal of the Mailbox role is not permitted.
- Uninstall cannot continue. Database ‘<Database ID>’: This mailbox database is associated with one or more active MailboxExport requests. To get a list of all MailboxExport requests associated with this database, run Get-MailboxExportRequest | ?{ $_.RequestQueue -eq “<Database ID>” }. To remove a MailboxExport request, run Remove-MailboxExportRequest <Recipient IDRequest Name>.
- Uninstall cannot continue. Database ‘Public Folders’: The public folder database “Public Folders” contains folder replicas. Before deleting the public folder database, remove the folders or move the replicas to another public folder database. For detailed instructions about how to remove a public folder database, see http://go.microsoft.com/fwlink/?linkid=81409&clcid=0x409.
- This server is set as a source server in one or more connectors.
- The Simple Mail Transfer Protocol (SMTP) service is installed on this computer. This must be removed before Setup can continue.
We will look at each issue and then “Retry” the uninstall to see if the issue preventing uninstall went away or not.
Issue #1 Summary: Still generating an Offline Address Book
Error: This Mailbox server is responsible for generating an Offline Address Book. Removal of the Mailbox role is not permitted.
Fix #1: Any Exchange version above Exchange 2010 uses Offline Address Books differently and create their own Offline Address Books as part of the upgrade process. The easiest way to get rid of this error is to make the new Offline Address Book the default and then delete the existing one. This is done through the new server Exchange Management Shell using the command:
Set-OfflineAddressBook -Identity "<new server OAB>" -IsDefault $true
Then on the Exchange 2010 server you can now remove the old Offline Address Book. One issue down!
Issue #2 Summary: Exchange is complaining about active Mailbox Export requests
Error: Uninstall cannot continue.
Database ‘<Database ID>’: This mailbox database is associated with one or more active MailboxExport requests. To get a list of all MailboxExport requests associated with this database, run:
Get-MailboxExportRequest | ?{ $_.RequestQueue -eq "<Database ID>" }. To remove a MailboxExport request, run Remove-MailboxExportRequest <Recipient IDRequest Name>
Fix #2: All Exchange mailboxes have been migrated to a new version and are absolutely done. The issue here isn’t just that existing requests aren’t removed, but that the account may not have access to remove them. From the Exchange 2010 Shell, run:
Add-RoleGroupMember “Mailbox Import Export” –Member <user account>
Note: There must already be a group called “Mailbox Import Export” for this to work that has the Mailbox Import Export role assigned to it. If that fails, create the group first by using this command and rerun the first command.
New-RoleGroup “Mailbox Import Export” -Roles “Mailbox Import Export”
Once your account is a member of this group, close and reopen Exchange Management Shell. Then to remove all MailboxExport requests, run:
Get-MailboxExportRequest | Remove-MailboxExportRequest
Issue #3 Summary: Public folders still existed
Error: Uninstall cannot continue.
The public folder database “Public Folders” contains folder replicas. Before deleting the public folder database, remove the folders or move the replicas to another public folder database. For detailed instructions about how to remove a public folder database, see http://go.microsoft.com/fwlink/?linkid=81409&clcid=0x409.
Fix #3: In my case, while public folders existed in Exchange 2010, the company decided they weren’t needed and could be purged and therefore were not migrated to the new Exchange server. However, they still existed in Exchange 2010.
Warning: Only do these steps if you want to permanently remove all public folders. Do not do these steps if you intend to migrate them to a new environment. These are the 3 commands to run via the Exchange 2010 Management Shell.
Get-PublicFolder -Server "<exchange 2010 server name>" "" -Recurse -ResultSize:Unlimited | Remove-PublicFolder -Server "<exchange 2010 server name>" -Recurse -ErrorAction:SilentlyContinue
Get-PublicFolder -Server "<exchange 2010 server name>" "Non_Ipm_Subtree" -Recurse -ResultSize:Unlimited | Remove-PublicFolder -Server "<exchange 2010 server name>" -Recurse -ErrorAction:SilentlyContinue
Remove-PublicFolderDatabase "<public folder database name>" -RemoveLastAllowed
Issue #4 Summary: Old server is listed as a source server in a connector.
Error: This server is set as a source server in one or more connectors.
Fix #4: From the new Exchange server Exchange admin center, navigate to mail flow, then send connectors. Look at each connector’s scoping section. If the old server is listed as a source server in any of these sections, then remove the old server. In my case, the old server was listed in a disabled connector.
Issue #5 Summary: SMTP installed on the server
Error: The Simple Mail Transfer Protocol (SMTP) service is installed on this computer. This must be removed before Setup can continue.
Fix #5: Easy fix using an administratively-elevated PowerShell prompt on the Exchange 2010 server and running these two commands (note the second command will automatically restart the server after the uninstall):
Import-Module Servermanager
Remove-WindowsFeature SMTP-Server –restart
Once each of these issues were resolved I reran the Exchange 2010 uninstall Readiness check to verify the issue being complained about had indeed been resolved.
I proceeded with the actual uninstall which was pretty uneventful except for during the last section.
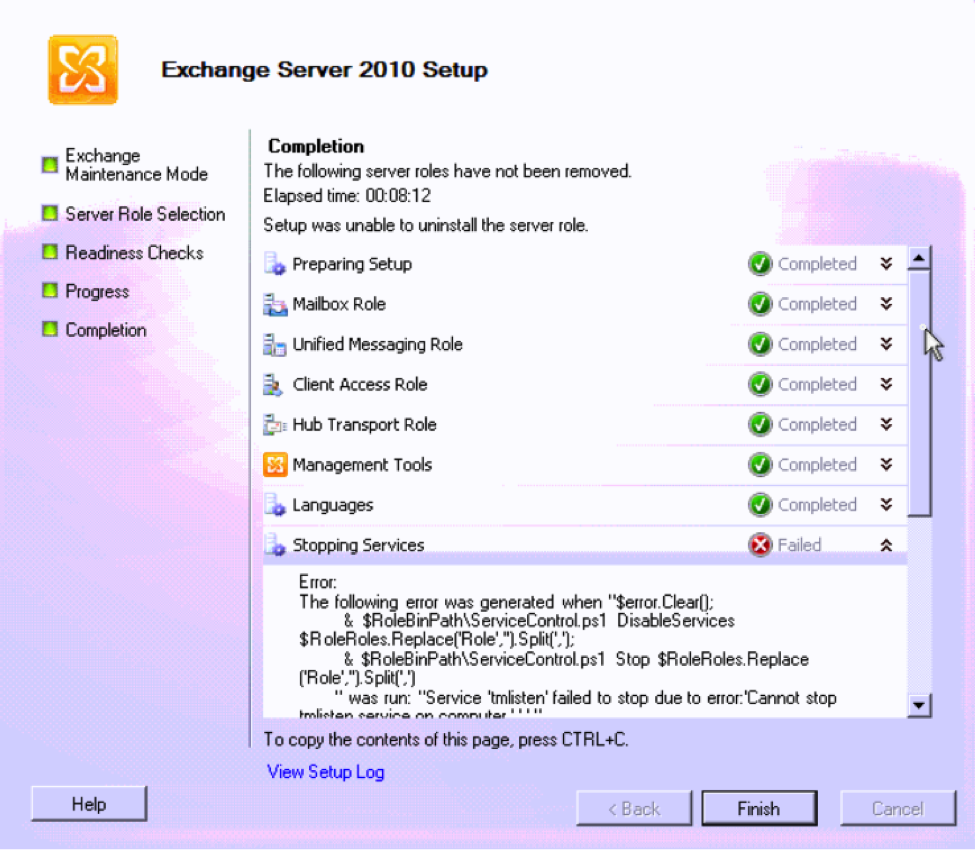
Issue #6 Summary: Trend Micro antivirus service could not be stopped by the Exchange uninstaller.
Error: The following error was generated when
"$error.Clear();& $RoleBinPathServiceControl.ps1 DisableServices $RoleRoles.Replace('Role','').Split(',');& $RoleBinPathServiceControl.ps1 Stop $RoleRoles.Replace('Role','').Split(',')"
was run:
“Service ‘tmlisten’ failed to stop due to error:’Cannot stop tmlisten service on computer ‘.’.’.”.
Service ‘tmlisten’ failed to stop due to error:’Cannot stop tmlisten service on computer ‘.’.’.
Cannot stop tmlisten service on computer ‘.’.
The requested control is not valid for this service
Fix #6: I exited Trend Micro’s antivirus from the system tray, then went to services and manually stopped the two services and reran the uninstall. While in my case it was Trend Micro, it could be any antivirus application that you may need to stop the services for to complete this step.
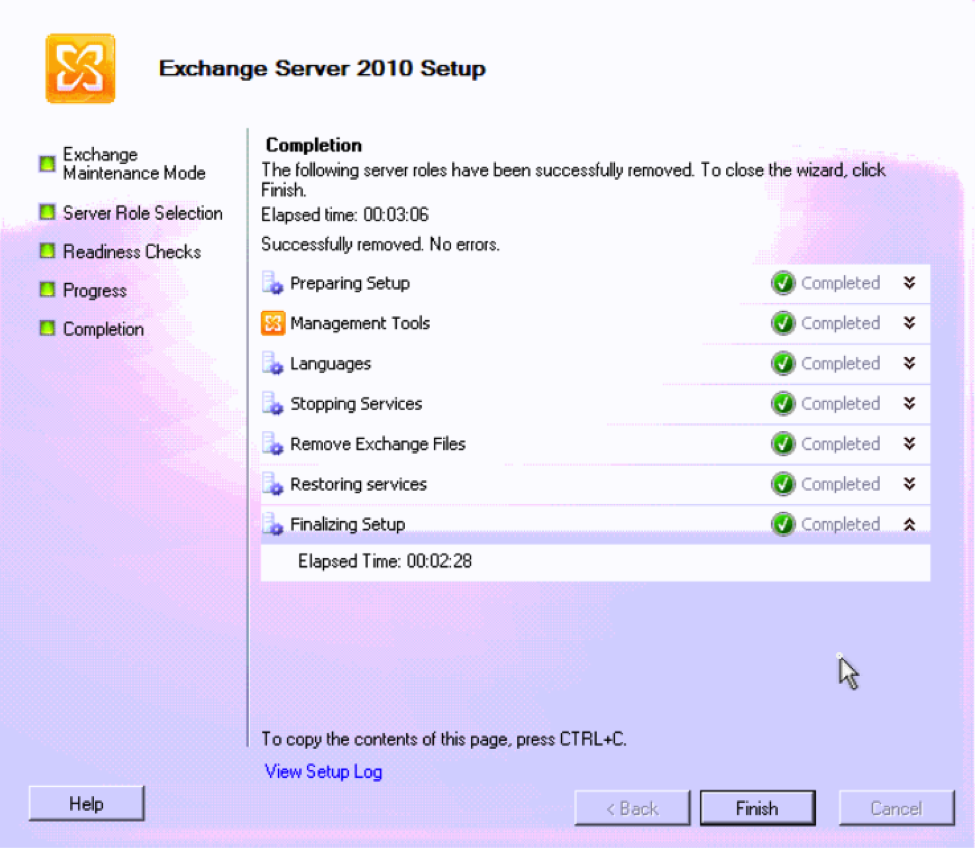
After a final attempt at uninstalling, you can come to your happy place and see that the uninstall finished successfully.
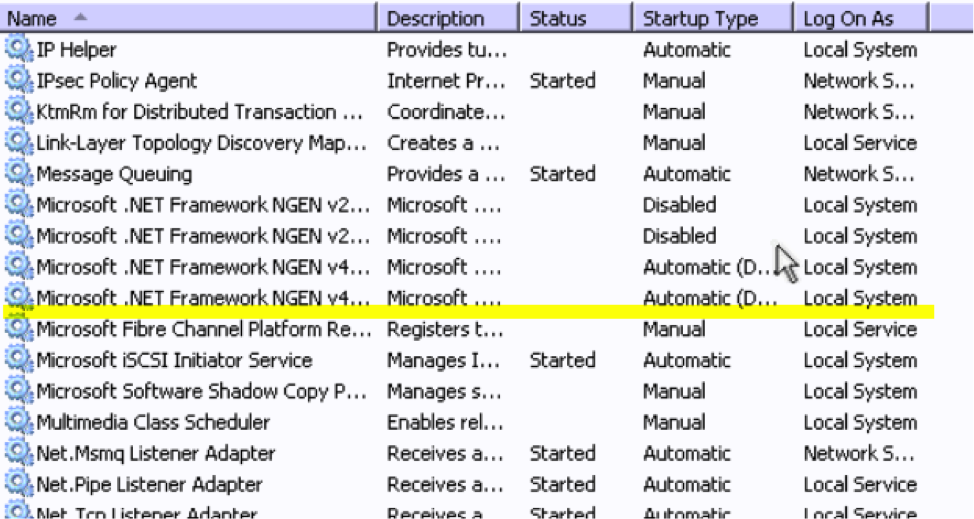
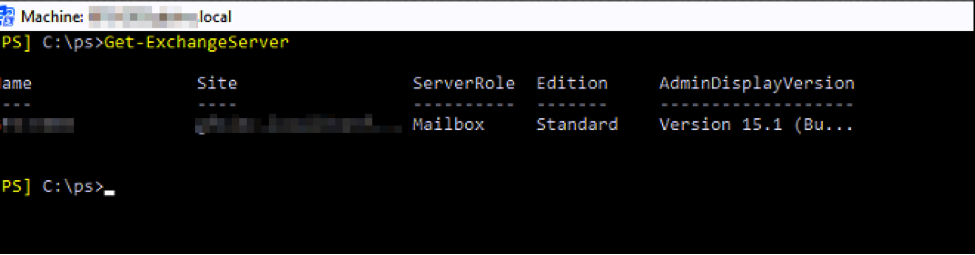
All Microsoft Exchange services were gone:
Running Get-ExchangeServer from the new server Exchange Management Shell only showed the remaining servers and no longer showed the Exchange 2010 servers.
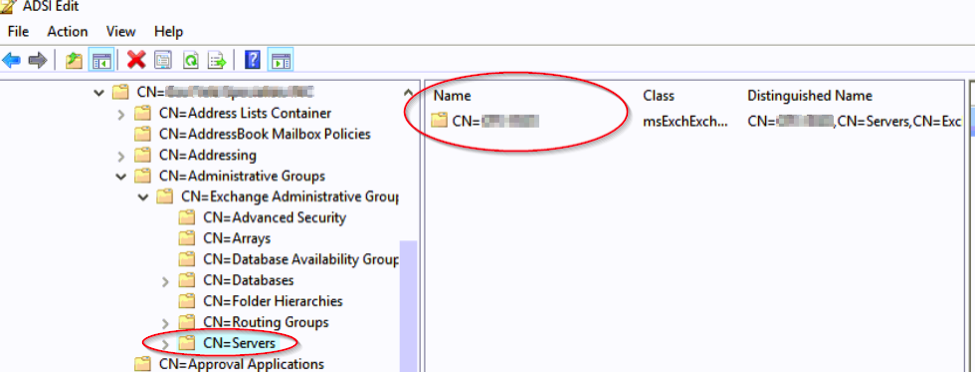
Even when checking in ADSIedit, double check that the only servers that should remain are remaining and the Exchange 2010 servers are gone.
Note: any time in ADSIedit.msc should be done with extreme caution and only done after a successful backup of your Active Directory is done.
Connect to the following:
“Configuration”, Navigate to Configuration,DC=Domain,DC=Com -> CN=Services -> CN=Microsoft Exchange -> CN=<organization name> -> CN=Administrative Groups -> CN=Exchange Administrative Group -> CN=Servers
So while I could have jumped straight to this last step and deleted the Exchange 2010 servers from the list here and then powered off the old Exchange 2010 servers, I wouldn’t have resolved issues in the environment that were still lingering. It’s always best to spend a little more time and make sure things are done correctly than to speed through a solution just to have issues persisting that could show up later. There are plenty more possible issues that can arise during an uninstall of an old Exchange server and the ones in this blog were just the ones I encountered in this specific scenario.
Now that you have successfully uninstalled Exchange 2010, decommission the servers the rest of the way by uninstalling any other software you may want to free up a license for, stopping backups, etc. Then remove the servers from the domain by adding them to a workgroup, and then shut them down.
Even after all these steps, there may be some things remaining in the directory that you should clean up. Open Active Directory Users and Computers and find the AD computer object for the now AD removed servers. Double click them and see what groups they are a member of. Chances are that object is still a member of the Exchange security groups. Go ahead and remove it from all the groups and call it a job well done.
Have a bigger challenge to talk through? Contact the IT experts and we can come up with a strategic solution together.
This publication contains general information only and Sikich is not, by means of this publication, rendering accounting, business, financial, investment, legal, tax, or any other professional advice or services. This publication is not a substitute for such professional advice or services, nor should you use it as a basis for any decision, action or omission that may affect you or your business. Before making any decision, taking any action or omitting an action that may affect you or your business, you should consult a qualified professional advisor. In addition, this publication may contain certain content generated by an artificial intelligence (AI) language model. You acknowledge that Sikich shall not be responsible for any loss sustained by you or any person who relies on this publication.