This website uses cookies so that we can provide you with the best user experience possible. Cookie information is stored in your browser and performs functions such as recognising you when you return to our website and helping our team to understand which sections of the website you find most interesting and useful.
Using Microsoft Word Templates in Dynamics 365 CE

Microsoft Word templates can be quite useful inside Dynamics 365 CRM (D365 CE), especially when a user wants to dynamically pull data from a record into a document that can be downloaded as a PDF, emailed, saved locally, attached as a note, or sent for review. Tools such as Microsoft flow allow a user to be able to generate a Word template and attach it to an email or upload it into SharePoint. Out-of-the-box functions allow users to generate and edit the template as well as run workflows to add them as note attachments to a record.
Let us say from one of our accounts, we want to generate a document that shows high level account information as well as pull the list of all related contacts and all related Opportunities to send to management each month. We not only want to generate this document, but we want to attach it in a note on the Account record and automatically send it in an email to our manager. Let’s go through how to create this particular Word template.
How to Create Word Templates
To create the word template, we can first go to our account and Select Word Templates from the top bar (if not visible, select the three dots to the right of the bar to see more options).
![]()

Once you select Word templates, click download template.
The next view will allow you to select the entity relationships to access more fields. In our example, we want the information around our account and also all related contacts and opportunity. So, under the 1:N relationship, I will look for Contact and Opportunity.
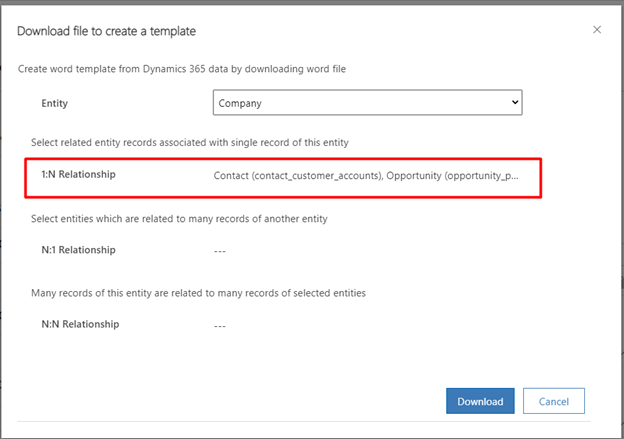
After that select download and a blank word document will download onto your computer with the XML mapping embedded.
Open your Word document and save it to your computer. After it is saved, select the Developer Tab. If you do not see the Developer Tab, use this Microsoft Support document as reference.
On the Developer Tab, select XML Mapping Pane.
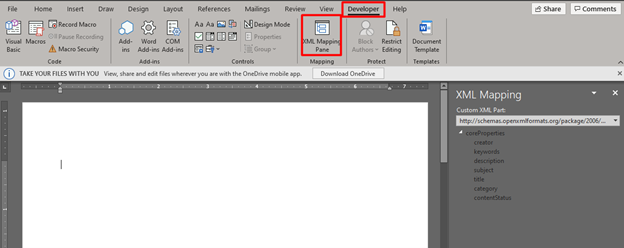
This will open the XML Mapping tab. Under Custom XML Part, select the drop down and click the part related to Microsoft Document Templates.
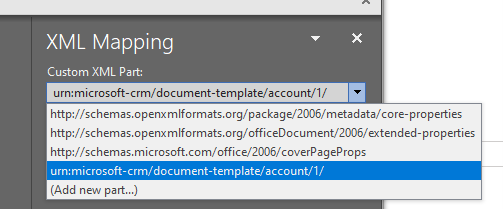
After you select the correct part, you will see the name of the entity that you grabbed this template from with a small arrow icon next to it. If you click on the arrow, you see the list of all available fields for your entity, in our example we will see all account fields. Scroll down through the list of fields at the bottom, and you’ll see the name and another arrow for the related records. Expanding on that arrow shows all the fields for the related records.

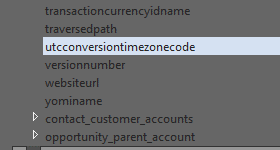
Add formats and content to the Word document as you normally would. If you would like to add one of the dynamic fields on the right, navigate to the section on the document where you want the form, right click the field you want to add, Select Insert Content Control and Plain Text. This will add the field to the form.
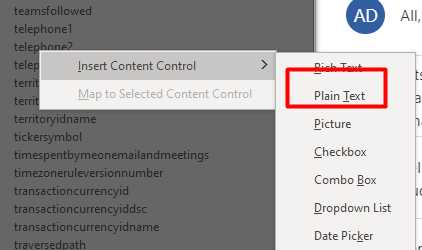

After you have added all the fields you want, you can save and upload this template to Dynamics under Document Templates in settings or directly from the entity where the template was created.
Download the Word Template to a PDF
You can now download or email a Word template as a PDF, but only if the organization has PDFs enabled.
- To enable PDF, navigate to App Settings from the Sales Hub.
- Select Overview, under productivity tools click manage next to “Convert to PDF.”
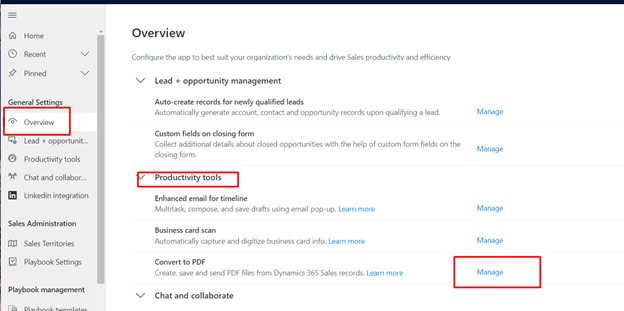
- From here, you can select what entities that PDFs can be enabled for.
- After you have saved your settings, an “Export to PDF” button will appear on the header of the entities.

- Select Export to PDF, and all available templates will appear. From here you can download the document locally, send it via an email, or attach it as a note in the timeline of the current record.
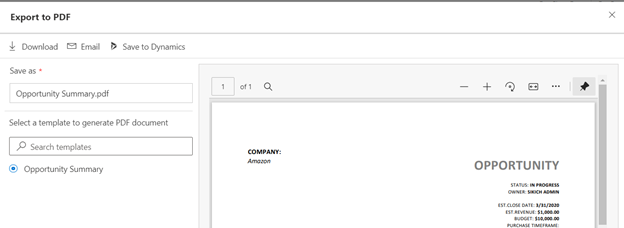
Once you have added the Word template to D365 CE, you can use a workflow action called “setWordTemplate” that when run will attach the Word template as a note on a record.

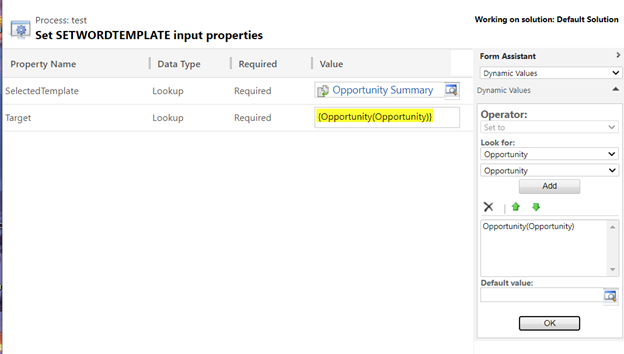
The above workflow will attach the Opportunity Summary as a note onto an Opportunity Record.
Once a note is created, you can use Power Automate to do things like upload that file to SharePoint, or automatically send the document in an email. With the document living on the note, it is easy to extract an attachment from a note with Power Automate.
Have any questions how to create and use Word templates in D365 CE or with Power Automate? Please reach out to our Microsoft 365 experts at any time!
This publication contains general information only and Sikich is not, by means of this publication, rendering accounting, business, financial, investment, legal, tax, or any other professional advice or services. This publication is not a substitute for such professional advice or services, nor should you use it as a basis for any decision, action or omission that may affect you or your business. Before making any decision, taking any action or omitting an action that may affect you or your business, you should consult a qualified professional advisor. In addition, this publication may contain certain content generated by an artificial intelligence (AI) language model. You acknowledge that Sikich shall not be responsible for any loss sustained by you or any person who relies on this publication.


