


NetSuite Saved Searches are a great tool for creating queries that can help pinpoint and store data for analysis and decision making. They are easy to build just by following a few steps. Get started today by using this simple guide to walk you through creating a saved search that is meaningful to your business.
How to Create a NetSuite Saved Search
A Saved Search can be created for almost any record or transaction type. The best way to start your Saved Search is with a native base your system already has.
The example we will be walking through is a search based upon the employee record. Navigating through the different menu options available in NetSuite, you will see the option to run a search on various transactions and records. Selecting this search option is the easiest way to build your query. See below the Search option available in the Employee List menu.
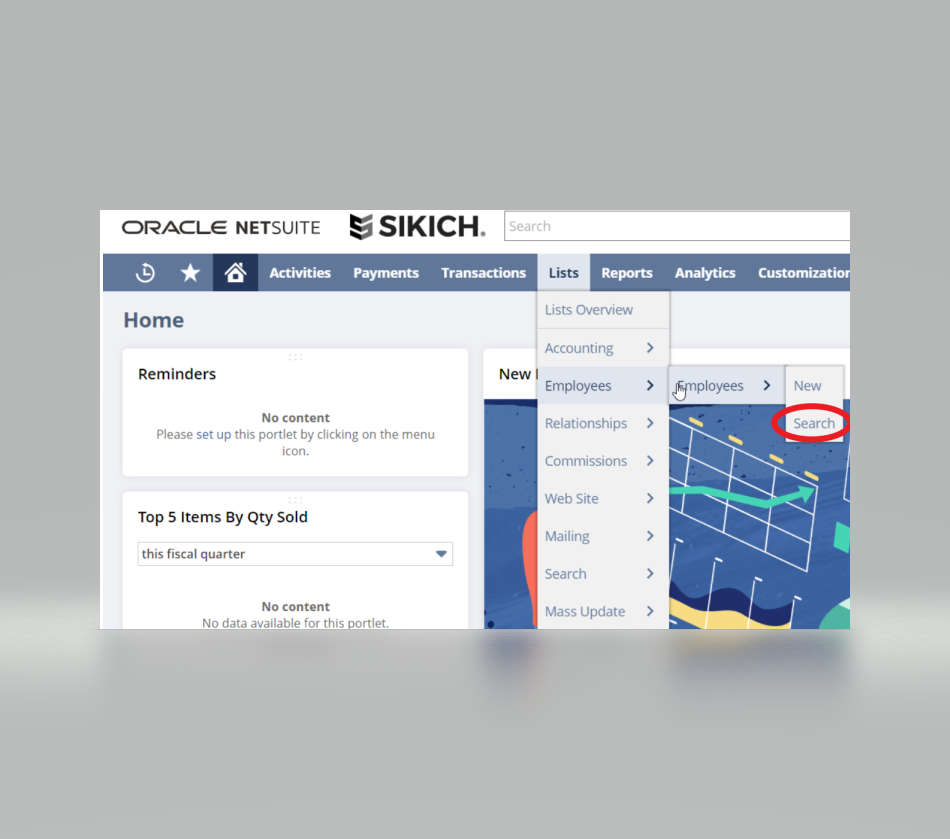
Once you have selected the search option on a record, you will see an option at the top of the screen to “Create Saved Search.” Once you have created it, you will need to fill out a name for your search. NetSuite does provide a default name, and in this case, the name was “Employee Search.” I changed the name to be unique. Aside from naming, there are several other options available for saved searches. These options include marking the search for use on your employee dashboard or reminders.

Customizing your NetSuite Saved Searches
After this point, you can begin to customize your Saved Search to fit your business needs. You can base your customizations upon criteria, results, highlighting, available filters, audience, roles, and email. Let’s walk through a few examples.
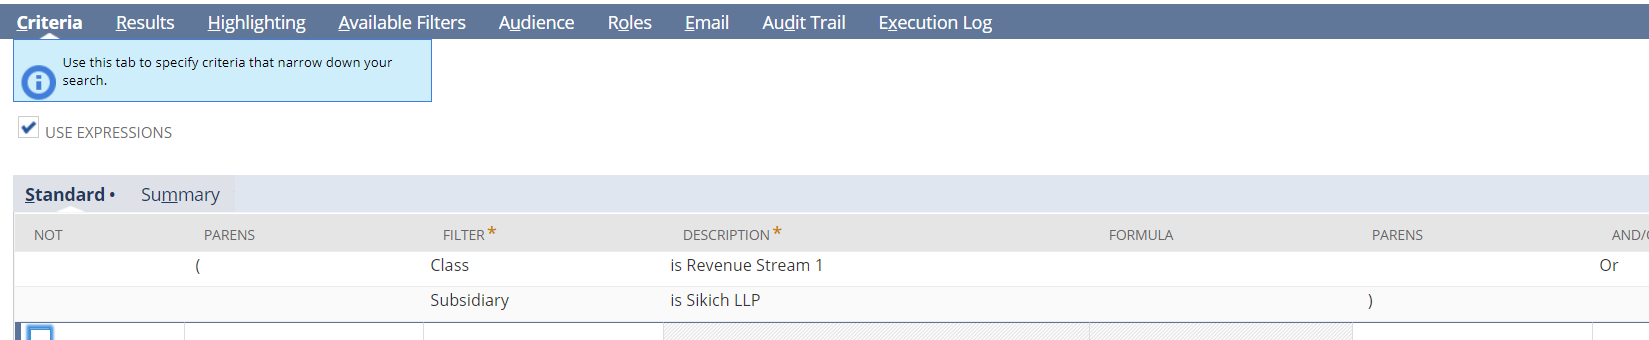
Criteria
Customizing your criteria can be useful when pulling only a specific set of data based on an attribute. There are generally many attributes to choose from, as referenced on the record you are pulling. Think of the criteria menu of options as any field populated on your employee record form.
There is also an option to set criteria based on expressions, which allows you to dissect further or join different attributes. As an example, I have specified the criteria to return only employees set to the Revenue Stream 1 Class or the Sikich LLP subsidiary.
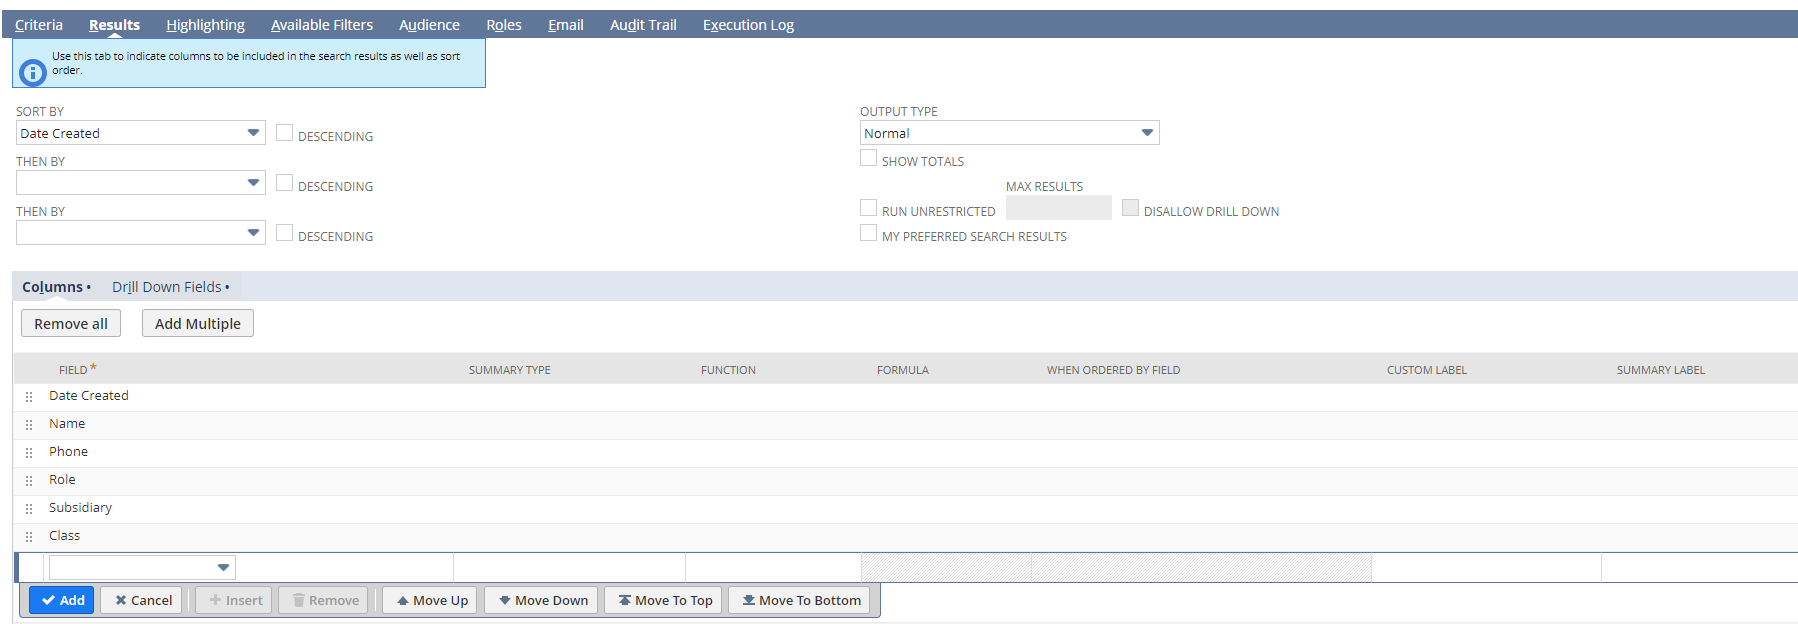
Results
Our next step is to specify the results or the columns we want our search to return. The returned results can be sorted by any attribute and a total of three attributes. In our example, we have sorted the data according to the date the employee was created in the system.
You can also set the search to a specific output type as well, including normal, report, grid, or graph. If this was transactional data, you can use a graph. Since this is a simple record query, we can select the output type as a report or normal type.
Highlighting
In this section of the saved search customization, we can set certain attributes to be distinguished by a highlight color or bold lettering. Like criteria or results customization options, a variety of attributes are available to create highlights. In our example, we have highlighted any employee, which we set to the Revenue Stream 1 Class.

Available Filters
Setting filters on a Saved Search is a great way to dissect data once it is already in your output view. This allows for further querying without changing the query criteria itself. For example, if you want to further dissect by an attribute not set in the criteria, we can add a filter to extract this data. When applying a filter to the saved search, it is important to make it available in the filter region. There is also an option to make the filter a multi-select as well. “Label” column of the filter selection allows for the filter to be rename for this example we have renamed our filter.

Audience, Roles, Email
Customizing the remaining tabs of the saved search focuses on restricting the viewership of the search (audience), applying the search as a default view for various roles/globally (roles), and emailing the search to specified users based upon a set schedule (email).
Final Saved Search
The final Saved Search now returns a query of employees assigned to the Sikich LLP subsidiary or Revenue Stream 1, highlighting the employees assigned to Revenue Stream 2.

Queries are powerful tools and can be intimidating if you have never created them before. We hope these simple steps have demystified how cumbersome creating a query can be. Stay tuned for NetSuite Queries 201, to follow!
If you have any more questions about setting up NetSuite Saved Searches or would like information about NetSuite, please contact us for assistance.
This publication contains general information only and Sikich is not, by means of this publication, rendering accounting, business, financial, investment, legal, tax, or any other professional advice or services. This publication is not a substitute for such professional advice or services, nor should you use it as a basis for any decision, action or omission that may affect you or your business. Before making any decision, taking any action or omitting an action that may affect you or your business, you should consult a qualified professional advisor. In addition, this publication may contain certain content generated by an artificial intelligence (AI) language model. You acknowledge that Sikich shall not be responsible for any loss sustained by you or any person who relies on this publication.