


In this article I am going to show you how to set up EFT for Payables in Dynamics GP from the initial setup to retrieving the file you send to your bank. This will include:
- Registering for EFT Payables
- Setting your checkbooks up for EFT payments
- Setting your vendors up for EFT
- Emailing remittances to your vendors
- Generating actual EFT files and emailing remittances to vendors
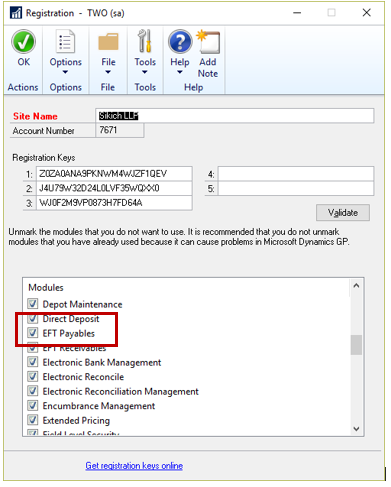
First check that your GP company is registered for EFT for Payables
(Administration > Setup > System > Registration)
Make sure that the EFT Payables box is checked. If not, select it and click OK.
Set up your EFT File Format
(Financial > Cards > EFT File Format)
This is where you set up the EFT file format according to the specifications of the bank you use. You will need to get this information from the bank, which will tell you what features you need. Typically, you can use one of the default ones in GP, but you can create a customized one under User-Defined in Format Type.
US – NACHA PPD and PPD+ are intended for payments to individuals/personal checking accounts. US – NACHA CCD and CCD+ are intended for payments to organizations/corporate accounts.

You can edit the descriptions for each line, but remember that you will be the only one that sees that. To see where the information is pulling from, click the double arrow in the right-hand corner to see the GP fields being used in the format or to type in a unique value.
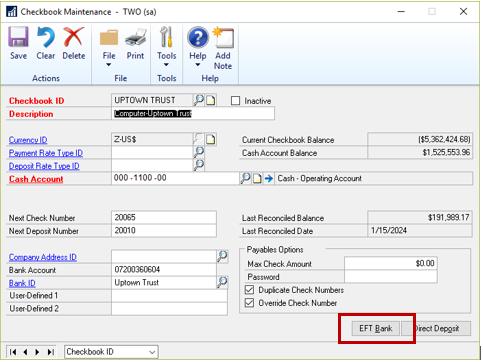
Set up your checkbooks that you will use for EFT payments
(Financial > Cards > Checkbook)
In the Checkbook Maintenance window, select a Checkbook ID and click EFT Bank.
In the Checkbook EFT Bank Maintenance window, enter the bank information relating to that checkbook.
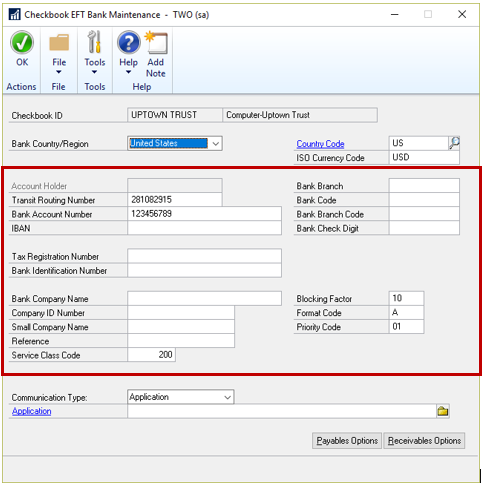
After you’ve entered the bank information, click Payables Options.
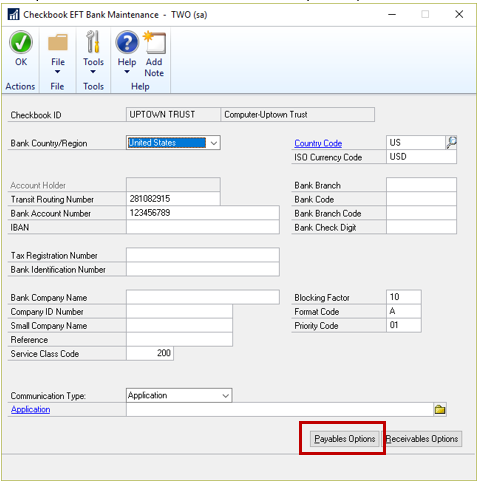
Select an EFT File Format under Single Format and your EFT Payment Number choice. Select the EFT File format that you created earlier. I recommend selecting EFT numbers as it marks a clear difference in your system.
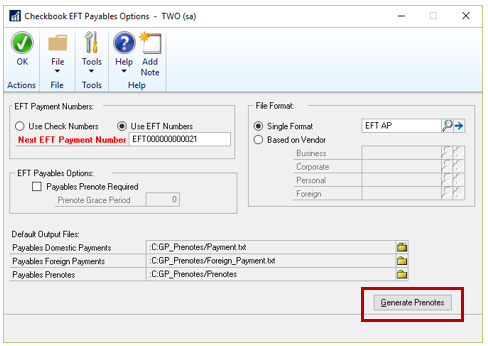
Select file locations for prenote and EFT ACH output. (Hint: Sometimes adding spaces, characters, or periods can give you an error message when generating files so try to avoid those!) You can click Generate Prenotes to test the output.
Set up for EFT Vendors
(Purchasing > Cards > Vendor)
Set up the vendors you would like to pay via EFT files. Click on the blue underlined Remit To to update the address to include EFT options.
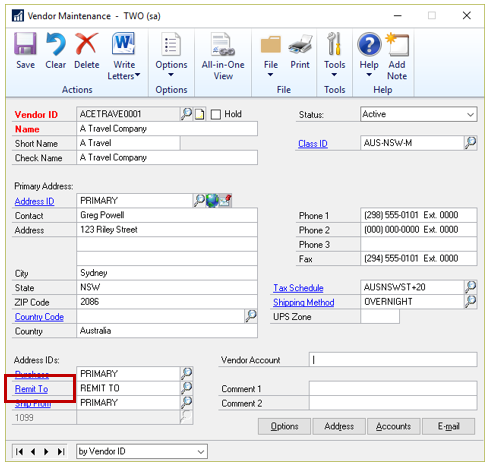
Click EFT Bank in the right-hand corner.
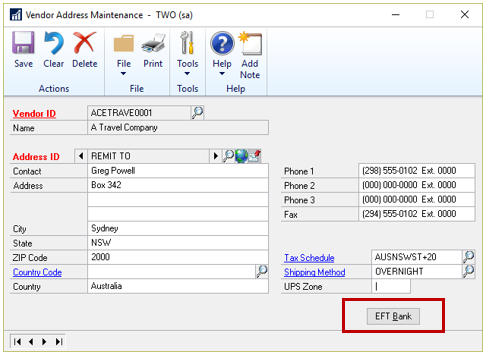
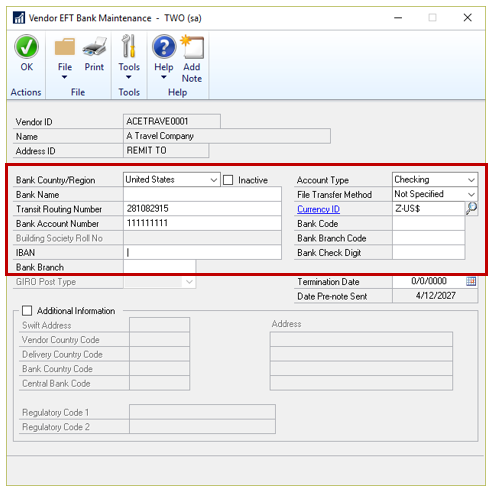
Enter the necessary bank information for the EFT transfer. Make sure the Currency ID and Bank Country match with the vendor and checkbook. Click OK in this window and then Save in the Vendor Address Maintenance window. Repeat these steps for every vendor you would like to pay via EFT.
Configure Email and Emailed Remittances to Vendors
Now let’s set up email remittances (Dynamics GP > Tools > Setup > Companies > Email Settings). Click the formats you would like to allow then select Purchasing Series.
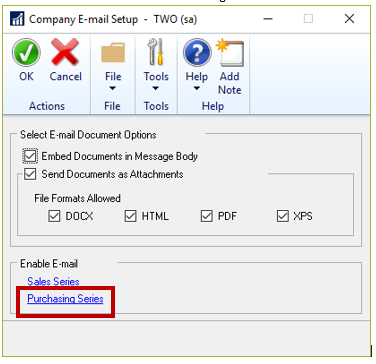
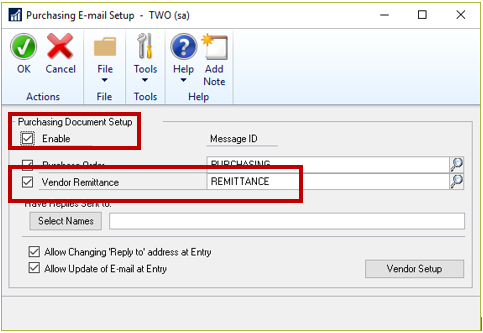
In the Purchasing Email Setup window, check enable at the top of the screen and then Click OK in this window and the next.
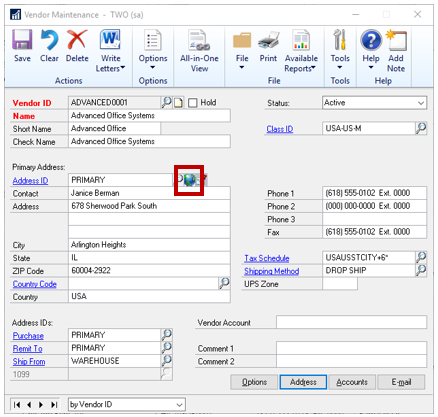
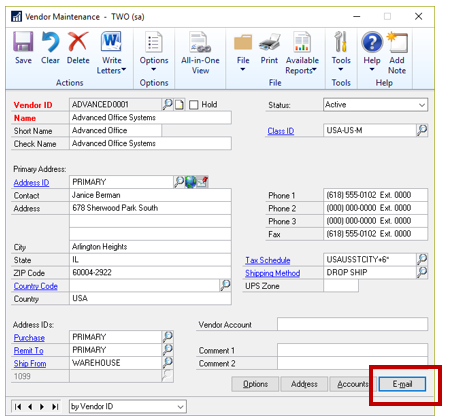
Open the Vendor card you would like to configure email for (Cards > Purchasing > Vendor). Click on the World button next to the Address field to open the Internet Information window.
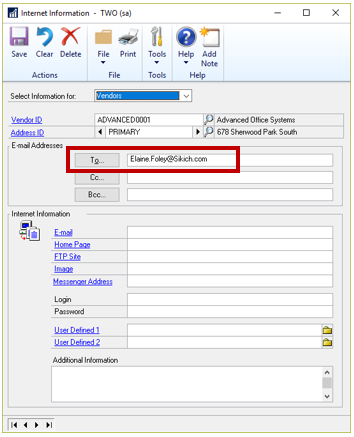
Type your own email in this Internet Information window to test. You can change this to the Vendor’s email address later. Save and close the window.
After saving your email, click the Email button on the Vendor card.
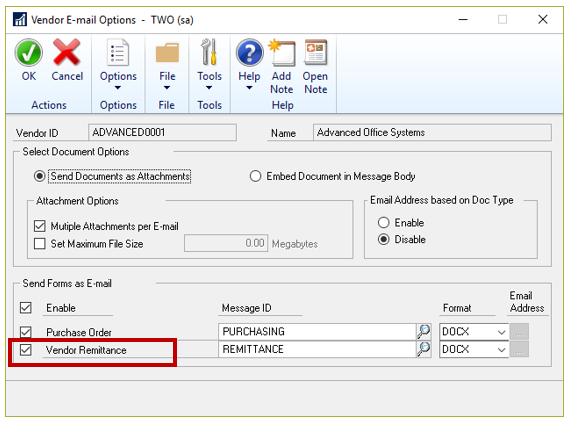
In the Vendor Email Options window, check that the Vendor Remittance box is checked under Send Forms as Email and confirm the format you would like. Click OK and then click Save.
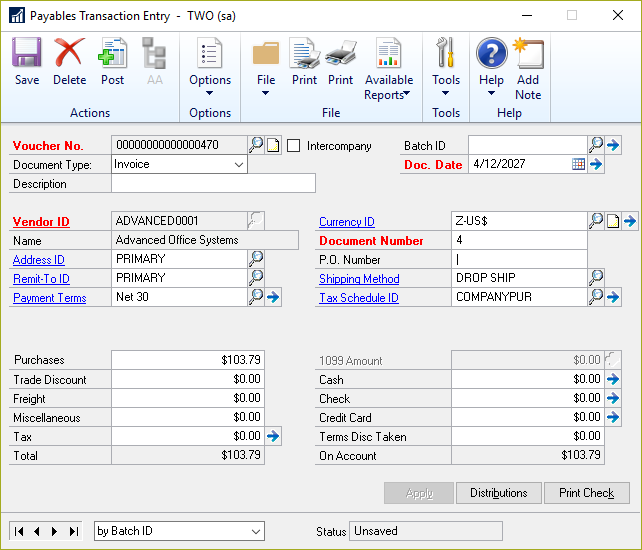
Enter Payables Transaction
(Purchasing > Transactions > Transaction Entry)
Enter a transaction entry for the EFT Vendor you just set up. Put in your amount and the document number. Post that transaction.
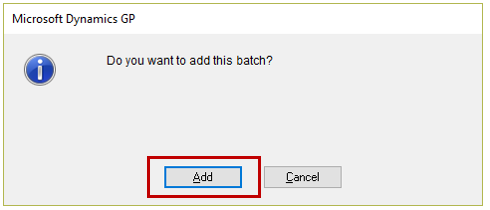
Navigate to the Build Payment Batch/Select Checks window. Enter a new batch in the Batch ID field and tab off the field.
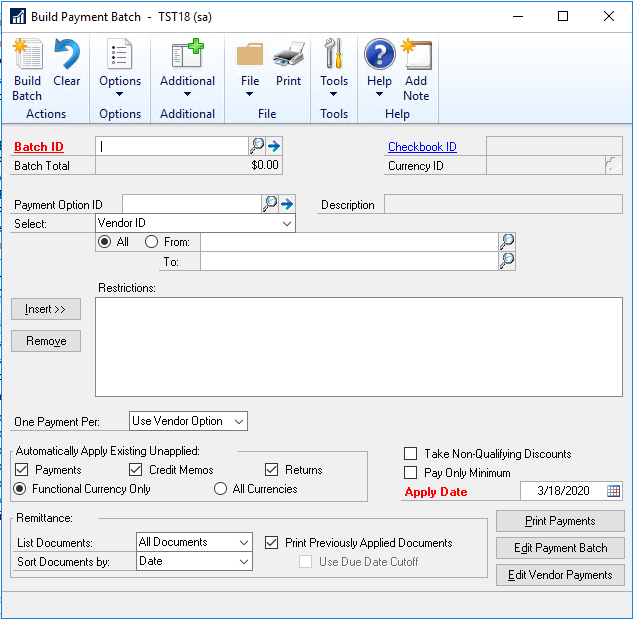
Click Add to create a new batch.
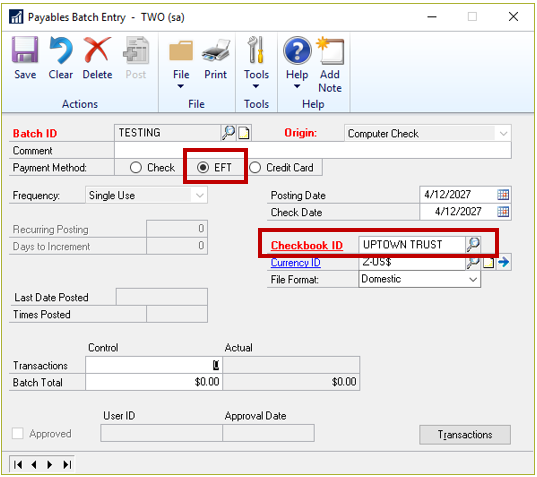
Select EFT for Payment Method in this window. Select the EFT Checkbook. Click Save.
Enter in the Vendor ID restriction and click Insert. Click Build Batch.
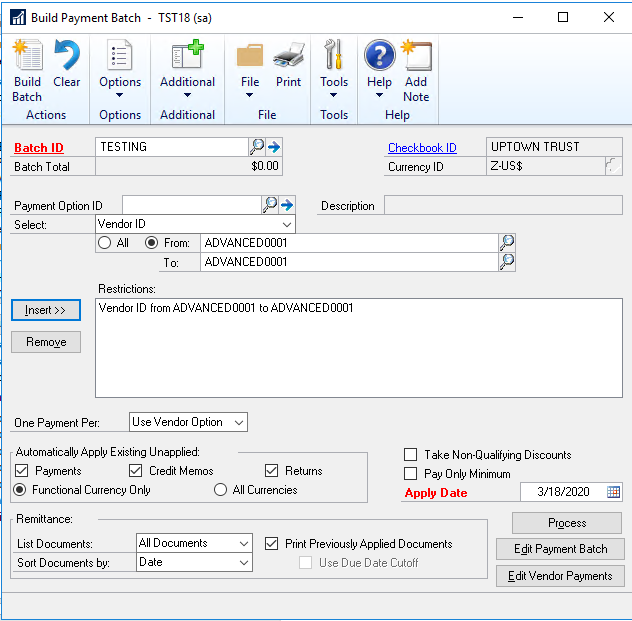
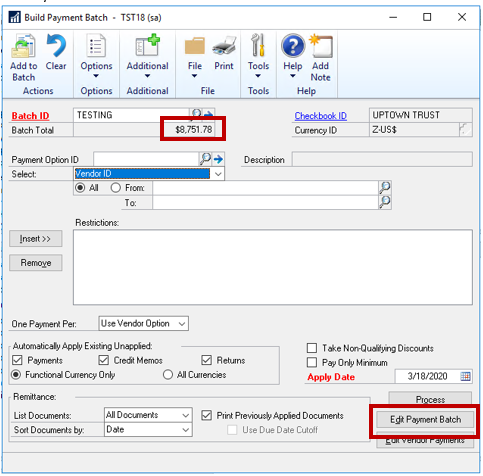
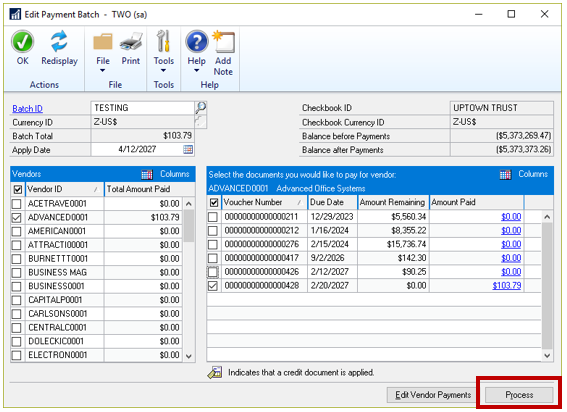
The dollar amount of open invoices for that vendor should populate in the Batch Total field. Click the Edit Payment Batch button.
Tab off the field to see all open vendors. Scroll down until you see the Vendor we just posted the invoice for. Check the box next to the Vendor ID.
Select the invoice you just posted. Click Process.
Once you’ve created the batch, you can post it as you normally would. You can only use Vendors that you have previously set up as EFT vendors.
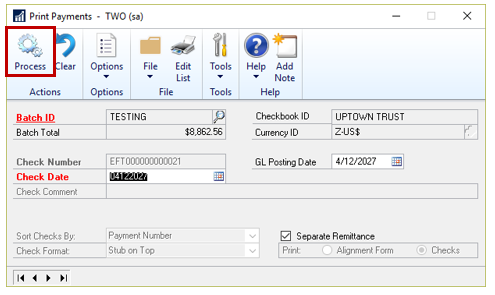
In the Print Payments window, you will see some check fields greyed out since GP knows not to print a physical check. Verify the Check Date and GL Posting Date. Click Process.
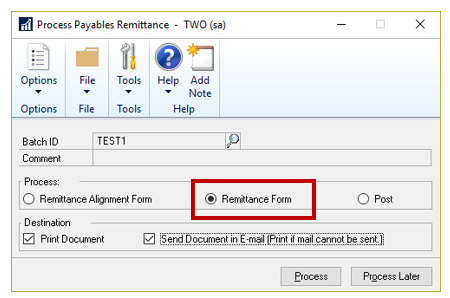
The Process Payables Remittance window will open.
In this window, you can print or email remittances or do both. To email remittances to your vendors, select the Remittance Form option and click Process. If you do not have this set up in GP, then the remittances will print.
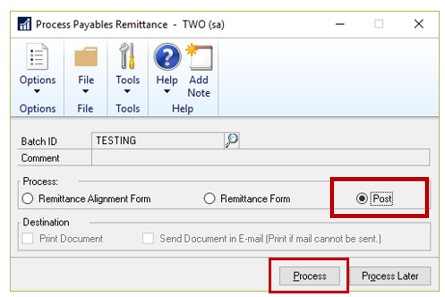
To post the EFT batch (whether or not you choose to email remittances), you must select the Post radial button and then click Process.
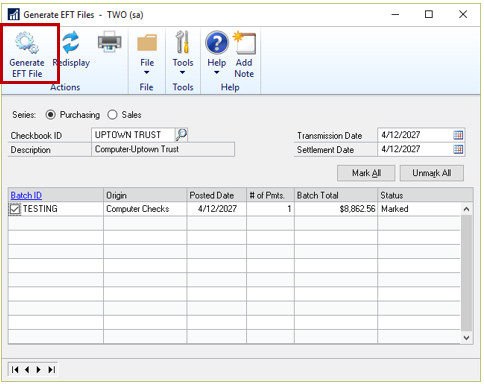
Generating the EFT ACH file
(Purchasing > Transactions > Generate EFT File)
Open the Generate EFT File window. Choose the checkbook you have set up for EFT and click Redisplay. Then select the batch you have posted. Click Generate EFT File.
Look for this window confirming that your EFT file has been generated in the path you specified earlier in your Checkbook EFT Payables Options window.
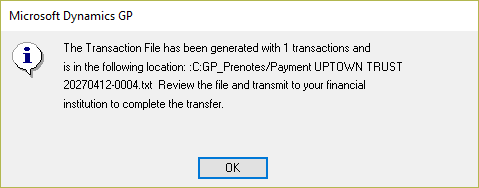
Now you can browse out to the location to see your electronic payment. And that’s it! Now you have fully set up your GP system for EFT payments and know how to pay your vendors!
Need help maximizing your Dynamics GP solution? We have a team of experts ready to help!
This publication contains general information only and Sikich is not, by means of this publication, rendering accounting, business, financial, investment, legal, tax, or any other professional advice or services. This publication is not a substitute for such professional advice or services, nor should you use it as a basis for any decision, action or omission that may affect you or your business. Before making any decision, taking any action or omitting an action that may affect you or your business, you should consult a qualified professional advisor. In addition, this publication may contain certain content generated by an artificial intelligence (AI) language model. You acknowledge that Sikich shall not be responsible for any loss sustained by you or any person who relies on this publication.