


Users of Hyper-V virtual machines with virtual hard disk files need to consider how much storage these files take up. VHD and VHDX files can grow unwieldy over time, as new content expands their file size. However, deleting content from a VHD does not shrink its file size. This means that virtual machine users are wasting storage and costs with blank data. This is especially problematic in thin provisioning setups. Don’t fret, though; there is a way to compact VHD and VHDX files to reclaim that missing space. It is possible to do this with a Compact function and three commands in PowerShell. Here’s how to compact VHD and VHDX files in Hyper-V 2012.
First, be sure to shut down the VM with the VHD/VHDX to be compacted. Open up PowerShell as an Administrator by pressing WinKey+X, and then choose PowerShell (Run as Administrator). Accept the User Account Control prompt either by clicking Yes or pressing Alt+Y.
In PowerShell, run the commands below, in this order, to mount the VHD locally. Next optimize its file size and then dismount the virtual hard disk file.
Mount-VHD -Path "C:ClusterStorageVolume1VM1Virtual Hard DisksVM1.vhdx" -ReadOnly
Optimize-VHD -Path "C:ClusterStorageVolume1VM1Virtual Hard DisksVM1.vhdx" -Mode Full
Dismount-VHD "C:ClusterStorageVolume1VM1Virtual Hard DisksVM1.vhdx"
Be sure to replace the file names in the commands with the VHD or VHDX file you are looking to optimize. Users can maximize the free space they reclaim by defragmenting the hard disk and emptying the Recycle Bin. Third-party tools that “zero out” deleted data can reclaim even more space.
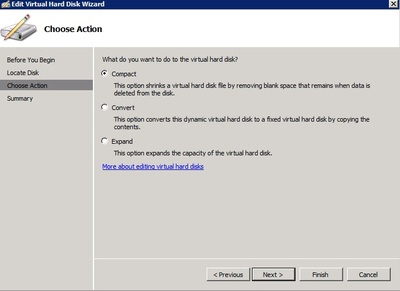
While Hyper-V’s Edit Virtual Hard Disk Wizard offers a Compact disk option, this will not actually shrink the VHD or VHDX in use. Unless the user mounts the virtual hard disk locally beforehand, running the Compact command will have no effect.
These steps will ensure that dynamic VHD and VHDX files will not use up excess storage and save on costs with running virtual machines. Have more virtualization questions? Contact our team of Sikich experts to help.
This publication contains general information only and Sikich is not, by means of this publication, rendering accounting, business, financial, investment, legal, tax, or any other professional advice or services. This publication is not a substitute for such professional advice or services, nor should you use it as a basis for any decision, action or omission that may affect you or your business. Before making any decision, taking any action or omitting an action that may affect you or your business, you should consult a qualified professional advisor. In addition, this publication may contain certain content generated by an artificial intelligence (AI) language model. You acknowledge that Sikich shall not be responsible for any loss sustained by you or any person who relies on this publication.