


Here are a few questions to get you thinking about using a Dynamics GP reclassification entry:
- Are you creating endless journal entries to reclass transactions due to users incorrectly entering or posting AP invoices? AR Transactions? Purchase Orders? Sales Orders? Cash Receipts? Inventory transactions?
- Is your reporting detail incomplete due to a lack of detail from reclassing your transactions with journal entries?
- Are you using Analytical Accounting or Multi-Entity Management (otherwise know as MEM) and having issues cleaning up miscoded invoices?
- Would you like to better manage your Suspense Accounts and PrePaid accounts?
Reporting Central’s “The Corrector” fixes the transaction at the source. The Corrector allows you to trigger a reversing journal entry and create a new journal entry from the problem transaction. It keeps all of the detail links and allows you to have an intact audit trail. It is very quick to install and is ready to use same day.
How to Use the Corrector Instead of a Dynamics GP Reclassification Entry
For this example, we’re going to use the Corrector for AP, although you can use it for AR, Sales, POs, Cash, and Inventory entries as well.
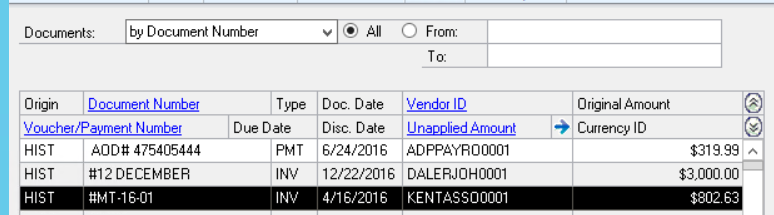
Look up the offending Invoice by using the Payables inquiries.
Click on the Distribution button to open the Distributions window and then click on the Correct Button.
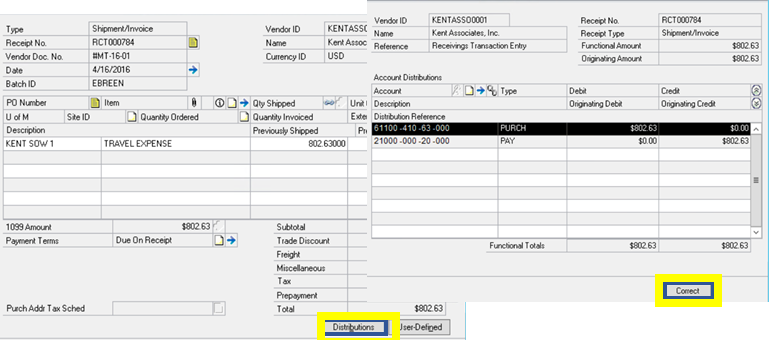
Select the distribution line that needs to be fixed. Enter the information in the Requested By and Reason for Correction fields.

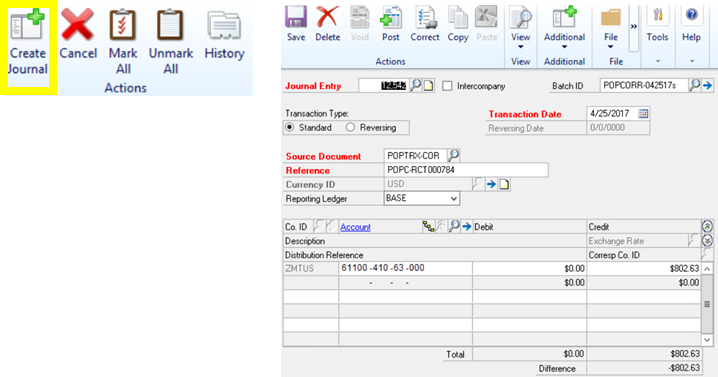
Click on the Create Journal Button to trigger the reversing journal entry.
A Journal Entry window will pop up: this is where you make the correcting entry. The Batch ID, Reference Description and Transaction Date are all auto-populated. Enter the correct GL Account on Line 1.
If you have Analytical Accounting enabled, you can also use this window to make correcting AA entries. Line 1 is pre-populated with the original distribution and associated AA codes for reversing. Distribution Line 2 is where you enter the new distribution, then open the Analytical Accounting window to enter the correct AA codes. Once the entries are complete, save the transaction. The Corrector also works with MEM and standard InterCompany.
Now you can pull up the same invoice from the Payables Inquiry screen. Drill into the Distribution window. The Correct button is now outlined in Red. This is your visual indicator that this transaction has been corrected. Click the Correct button to open the window, then click on History to view the Audit Trails.

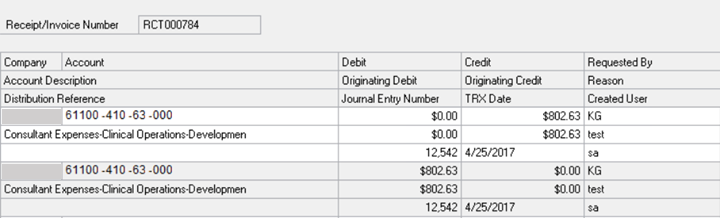
This is the HISTORY screen for the corrected transaction. All of the information needed to answer any questions or satisfy an auditor is included here: the User ID of the user making the corrections, the reason for the correction, the correcting journal entry number, posting date, and originating values.
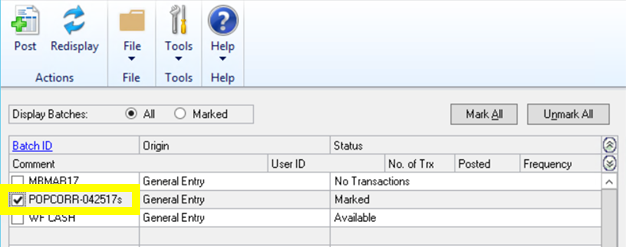
Now all of your reporting is intact and complete with no gaps due to mysterious reclassified journal entries. The process is easy to use and quickly deployed. The Corrector is available for 6 modules, AP, AR, Cash, Purchase Order, Sales Order, and Inventory. You can buy a single module or mix and match the modules you need to create your own bundle.
You can view a quick video demonstration at https://reporting-central.com/youtube-video-gallery/
If you have further questions, feel free to reach out to Sikich or Reporting Central.
This publication contains general information only and Sikich is not, by means of this publication, rendering accounting, business, financial, investment, legal, tax, or any other professional advice or services. This publication is not a substitute for such professional advice or services, nor should you use it as a basis for any decision, action or omission that may affect you or your business. Before making any decision, taking any action or omitting an action that may affect you or your business, you should consult a qualified professional advisor. In addition, this publication may contain certain content generated by an artificial intelligence (AI) language model. You acknowledge that Sikich shall not be responsible for any loss sustained by you or any person who relies on this publication.