


When data sets need to be transferred from other applications into NetSuite, the CSV import can save time and prevent errors. Here’s how to easily import a CSV into NetSuite.
Locate the Import Assistant by navigating to Setup > Import/Export > Import CSV Records.
After choosing the import type, record type and file to upload you will be directed to a page that gives you three import options:
- ADD – This option allows you to create new transactions
- UPDATE – This option allows you to make changes to existing data in NetSuite
- ADD OR UPDATE – This option will add any new transactions and make necessary edits to transactions already in the system
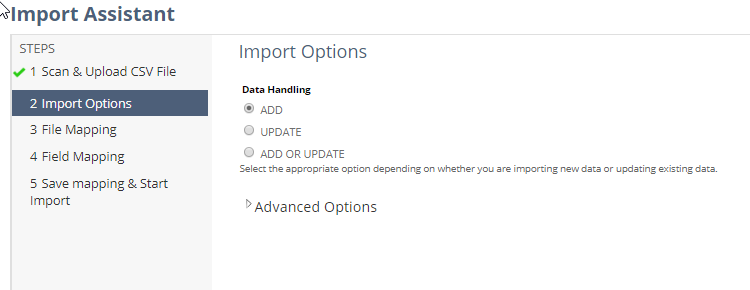
Advanced Options are also available that can be accessed by clicking on the arrow to the left of the label.

These Advanced Options allow you to do the following:
- Log System Notes for Custom Fields: this option allows for the creation of system notes on custom field data.
- Overwrite Missing Fields: this option clears NetSuite fields mapped to CSV file fields that do not contain data.
- Validate Mandatory Custom Fields
- If Validate Mandatory Custom Fields is checked, the system will check for mandatory field information and if it is missing, it will reject the upload.
- If Validate Mandatory Custom Fields is unchecked, the system doesn’t check for mandatory fields and will allow them to be blank on the import.
- Ignore Read-Only Fields: This option allows you to import CSV files containing values for read-only fields without causing errors.
- Custom Multi-Select Value Delimiter: The value in this field is a symbol (by default it is a pipe symbol | ). If a user wants to import data for multi-select fields, this symbol is used between the field values.
- CSV Decimal Delimiter: This option allows you to use a period or a comma as the decimal mark symbol in your uploads.
- Custom Form: This allows you to import records to your custom forms. By default, the standard form is selected in this field.
- Run Server SuiteScript and Trigger Workflows: This option allows you to automatically run any workflows or server-side SuiteScripts on the transaction at the time of upload. It should be noted that running server SuiteScript will slow the import process.
If you would like more information about NetSuite, please please contact us at any time! You can also learn about more great tips for NetSuite on our YouTube playlist or our other blog posts.
This publication contains general information only and Sikich is not, by means of this publication, rendering accounting, business, financial, investment, legal, tax, or any other professional advice or services. This publication is not a substitute for such professional advice or services, nor should you use it as a basis for any decision, action or omission that may affect you or your business. Before making any decision, taking any action or omitting an action that may affect you or your business, you should consult a qualified professional advisor. In addition, this publication may contain certain content generated by an artificial intelligence (AI) language model. You acknowledge that Sikich shall not be responsible for any loss sustained by you or any person who relies on this publication.