


Every business aims to protect its cash flow and avoid unnecessary expenses, which is why double paying for a product or service that has already been settled is an error no company wants to make. To avoid these kind of errors, good recordkeeping on prepayments made to vendors is key. Microsoft Dynamics 365 (D365) for Finance and Supply Chain Management counts with a simple yet effective prepayment process that makes for accurate accounting records and generates flags to alert you when you have outstanding prepayments with a vendor on a Purchase Order.
Vendor prepayments are payments made by a buyer or customer to a vendor or supplier in advance of receiving goods or services to secure their future delivery. Some examples of goods and services that typically require prepayments include raw materials or inventory, consulting, advertising, and rent or lease agreements. When a vendor prepayment is created, the accounting treatment is to record the payment as an asset on the balance sheet, typically under a prepaid expense account. This is indicative that the company has paid for a product or service it has not yet received.
As the goods or services are received or consumed, the prepayment is gradually or fully recognized as an expense in the income statement and offset from its initial recording on the balance sheet. When a partial or final invoice to the vendor is entered, the system will alert you that an outstanding credit must be applied to account for the initial prepayment issued to the vendor.
Let’s take a look at what this process looks like in D365.
Creating a Vendor request for deposit on a Purchase Order
Procurement and sourcing > Purchase orders > All purchase orders
- Enter or select a PO requiring a deposit.
- In the Action Pane, click Purchase, then Prepayment.
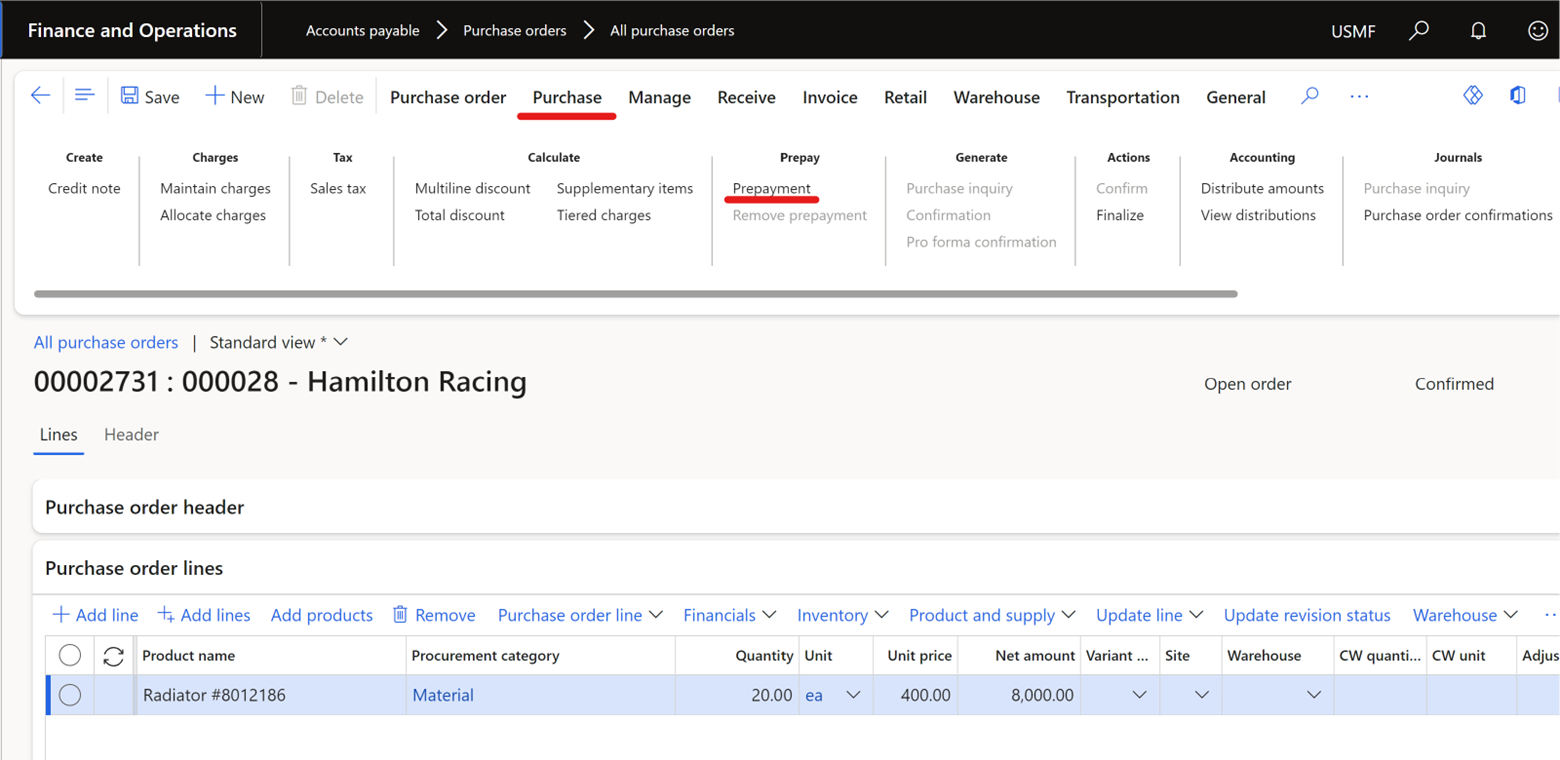
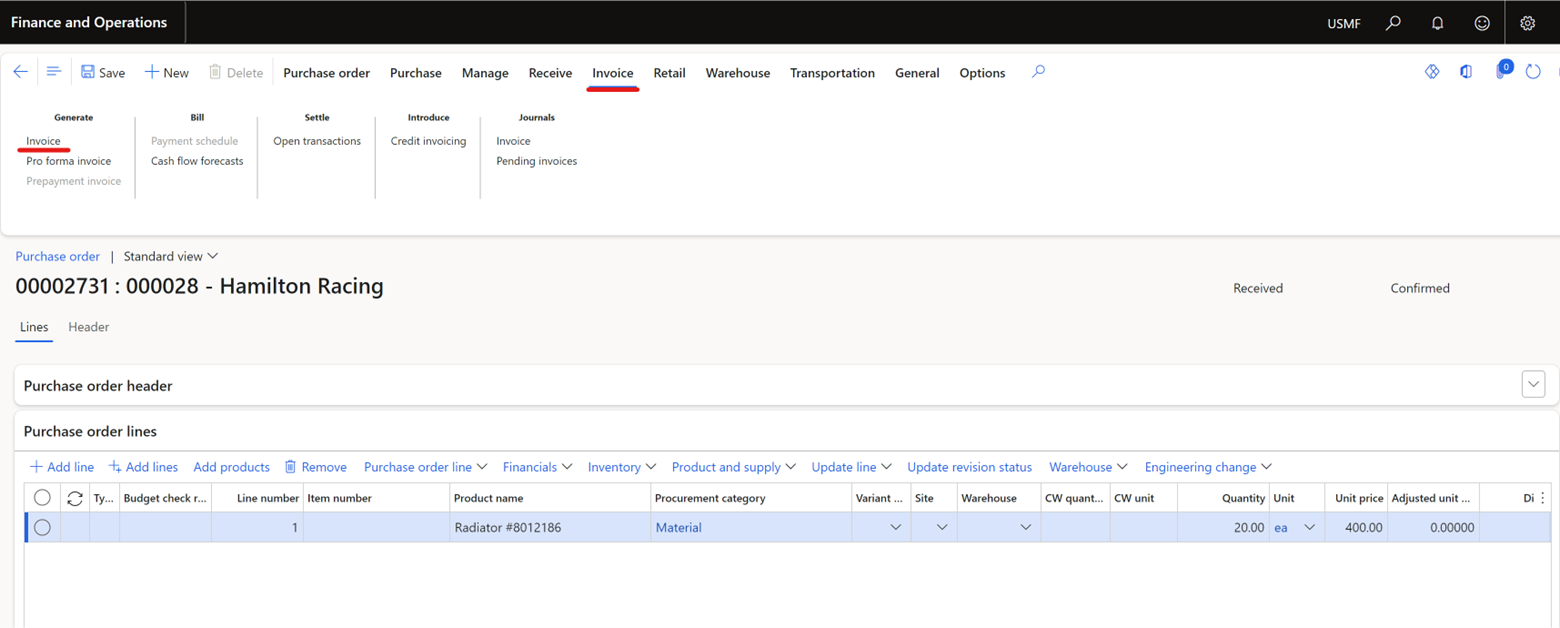
In this example, 20 radiators for a total of USD $8,000.00 are being procured. The vendor requires a 50% deposit for the order to be filled.
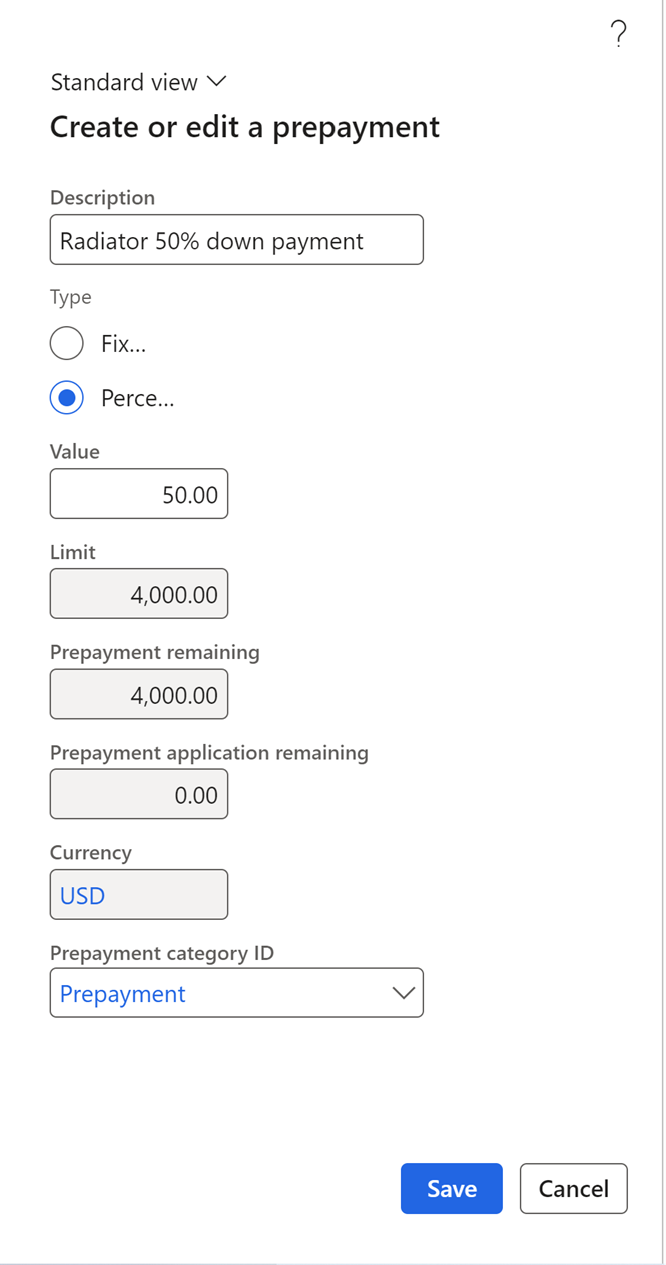
- In the Prepayment window, enter the following:
- Description: The text entered here will appear on the prepayment invoice line.
- Type: Define whether the prepayment is being requested as a Fixed amount or as a Percentage of the entire order.
- Value: Enter the fixed amount or percentage value for the prepayment according to the selected Type.
- Prepayment category ID: Select the category on which the prepayment will be posted to. This is typically a Prepayment category linked to a Prepaid expenses account in the General Ledger.
- Click Save.
As seen below, a 50% prepayment has been selected for the Purchase Order. The system will automatically calculate 50% of the total of the order (including sales tax if applicable).
Once the prepayment request has been entered, the Accounts Payable department can pick up the request and generate a prepayment invoice for payment. Please note that the Purchase Order must be in Confirmed status for the invoice to be generated.
Generating a Prepayment Invoice
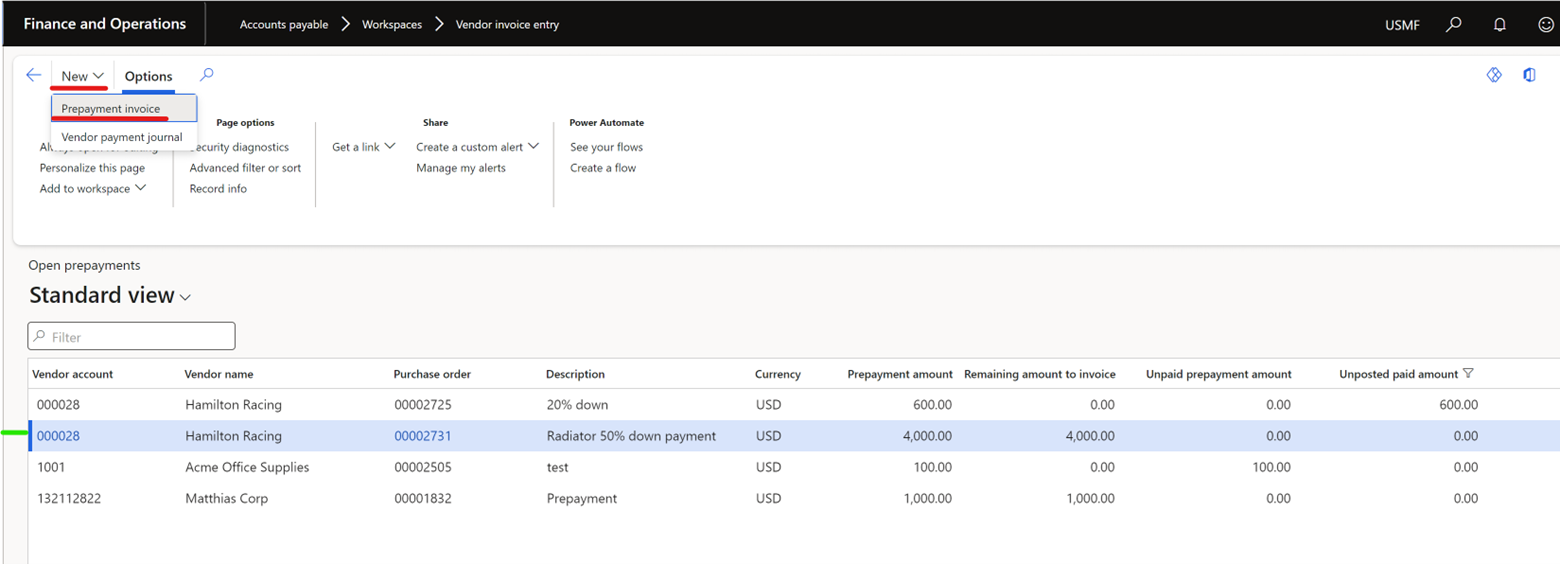
- Navigate to the Vendor Invoice Entry Workspace.
- Click on Prepayments > Open Prepayments

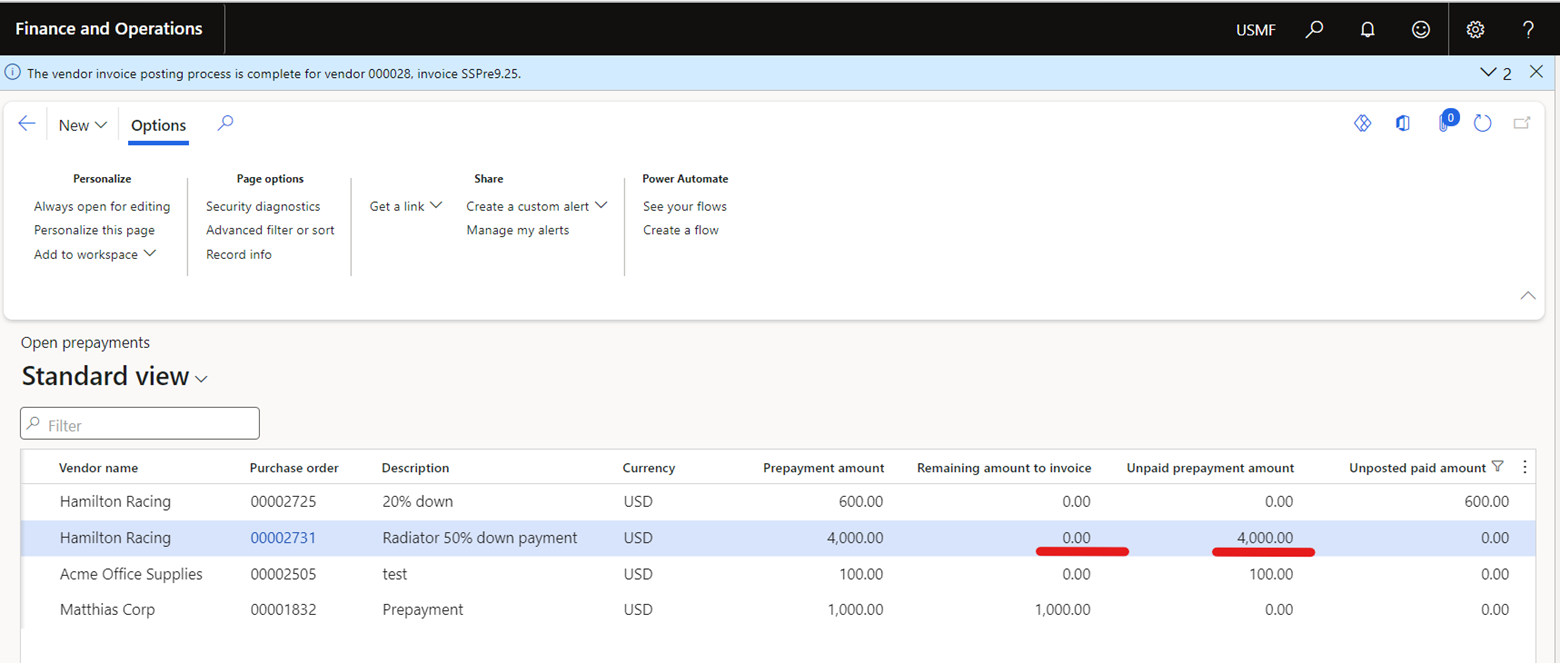
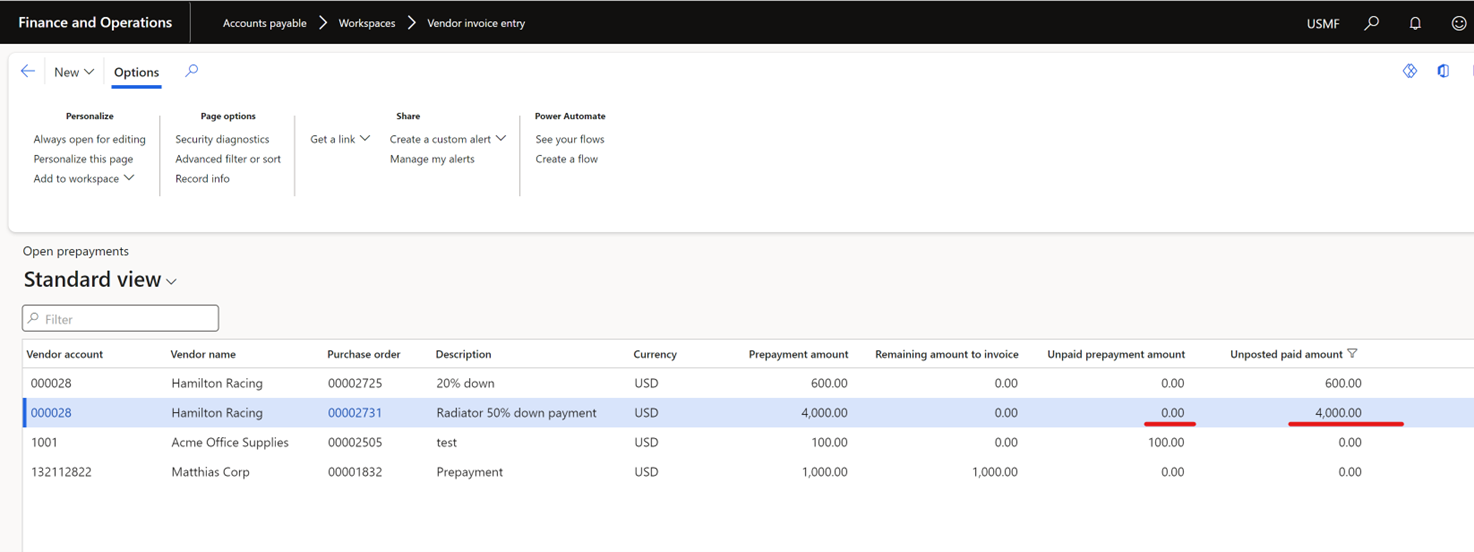
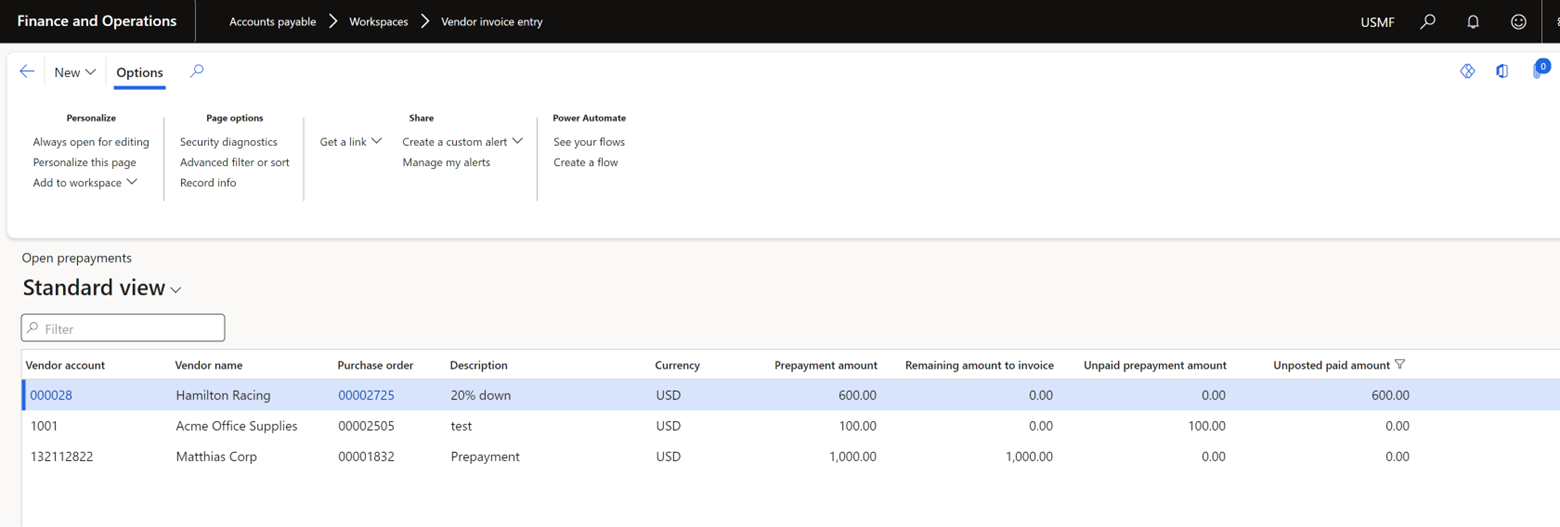
In the Open prepayments form shown below, the Accounts Payable department can see all Prepayment requests, Prepayment invoices, and their status. As an example, our prepayment request highlighted below shows the prepayment amount request of USD $4,000.00, and the table indicates that this prepayment has not been invoiced as there is still a “Remaining amount to invoice” of the same value.
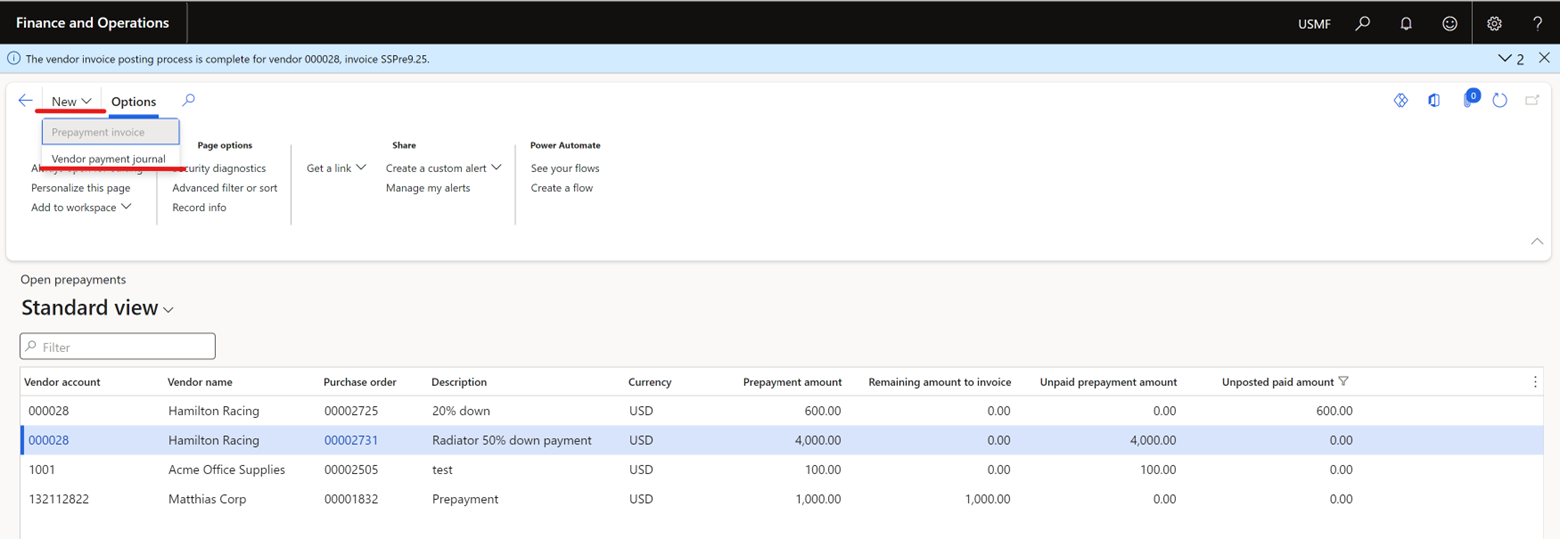
- To generate a prepayment invoice for this request, highlight the desired line and click New. Then, select Prepayment invoice.
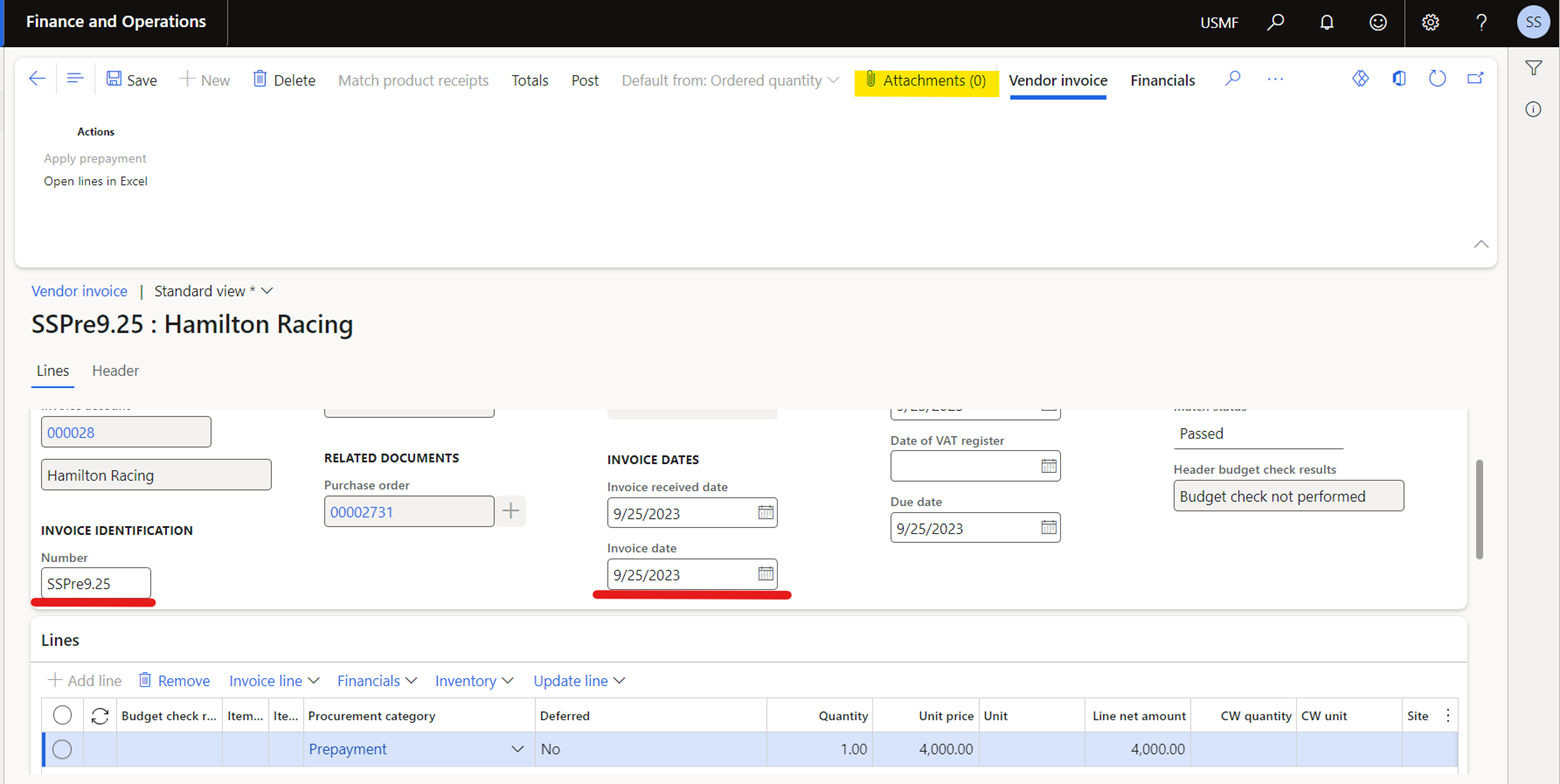
- On the invoice, enter the Invoice Number and Invoice Date.
Fun fact: The Attachments button highlighted in yellow below is also available if you would like to attach and retrieve back up documentation on the invoice journal. The attachment functionality is available in most forms in the system.
- Click Post.
Please note that if there is a workflow approval process enabled, the invoice must be approved before the system will allow you to post the invoice.
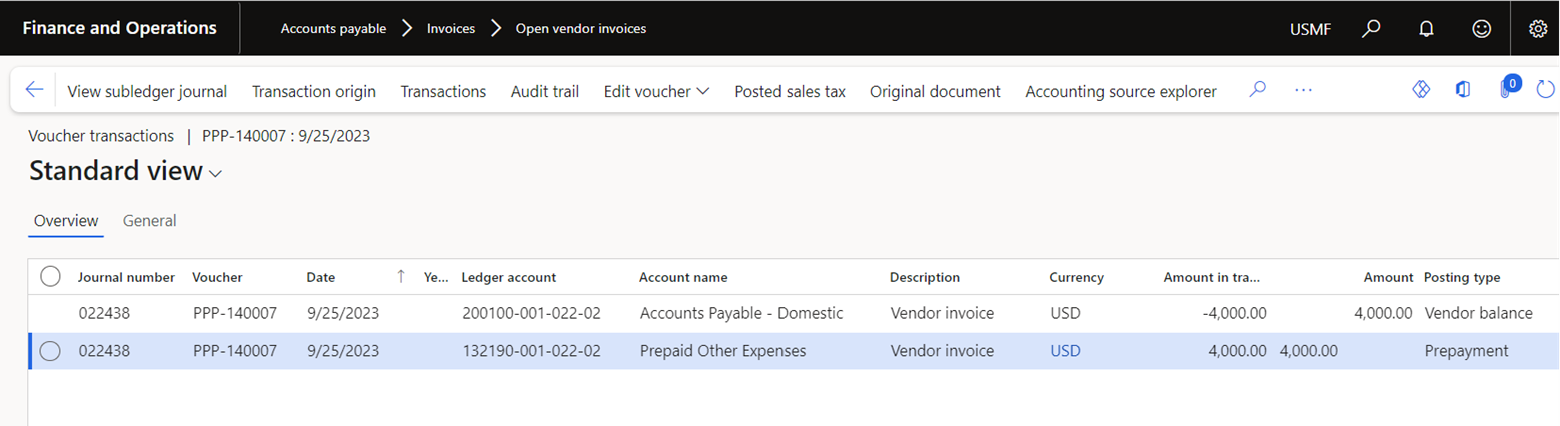
In the voucher below which was generated for the invoice postings, you will notice a credit is posted to the Vendor balance account, and a debit is posted to the Prepaid expenses account.
- If you go back to the Open Prepayments form, you will notice that the USD $4,000 amount has moved from the “Remaining amount to invoice” and into the “Unpaid prepayment amount.” This indicates that the invoice has been posted but has not been paid yet.
Generating payment for the prepayment invoice
- Navigate to the Open Prepayments form in the Vendor invoice entry workspace.
To generate a vendor payment for this invoice, highlight the desired line and click New. Then, select Vendor payment journal.
Please note that a vendor payment journal can be generated through this form, but the outstanding payable will also show up in Payment proposals if you desire to utilize that approach instead.
- Select a Journal Name, then enter a Description if desired.
- Click on Lines.

- Select the Vendor account. Click Save to refresh.

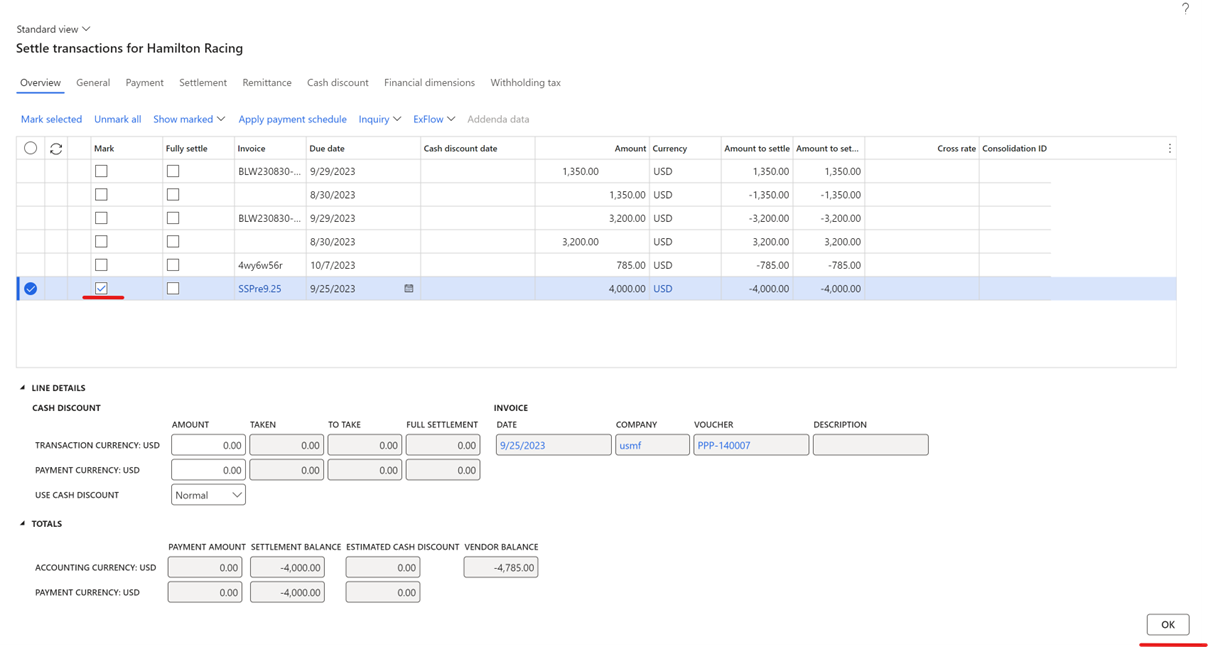
- Click Settle transactions.
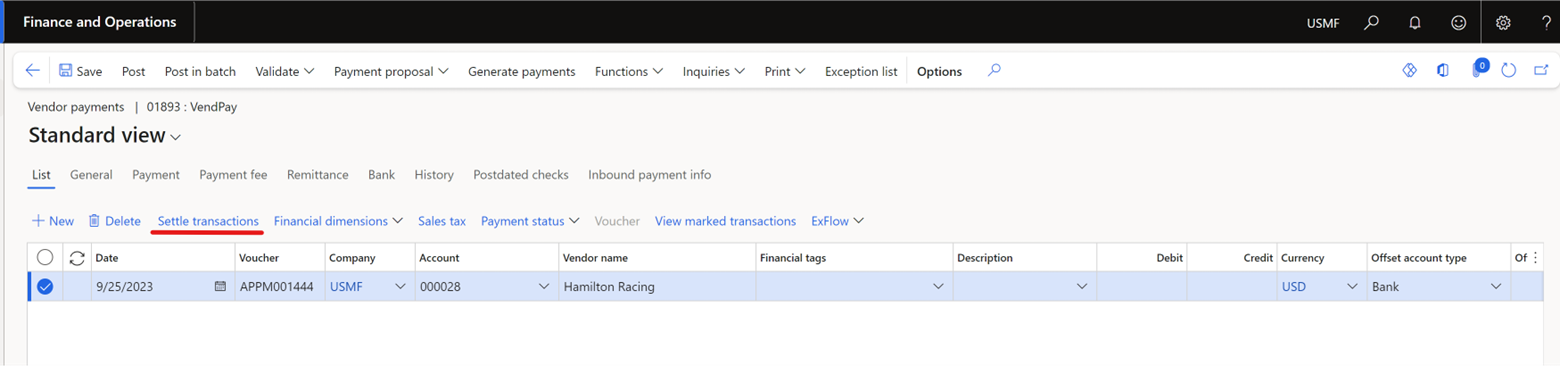
- Mark the invoice and click Ok.
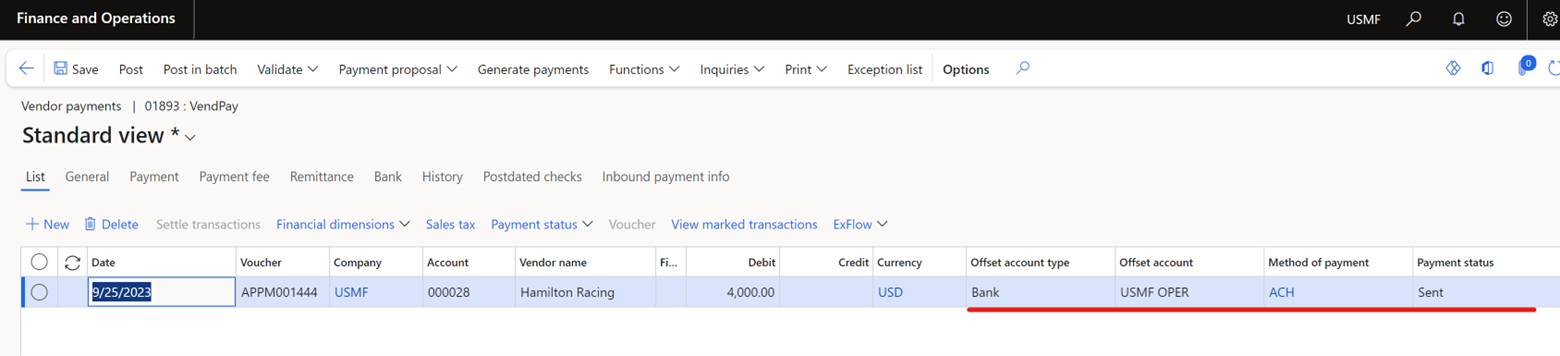
- The system will bring in the invoice line into the payment journal. Select the Offset account type, Offset account, and Method of Payment. Generate the payment in accordance to the selected Method of Payment.
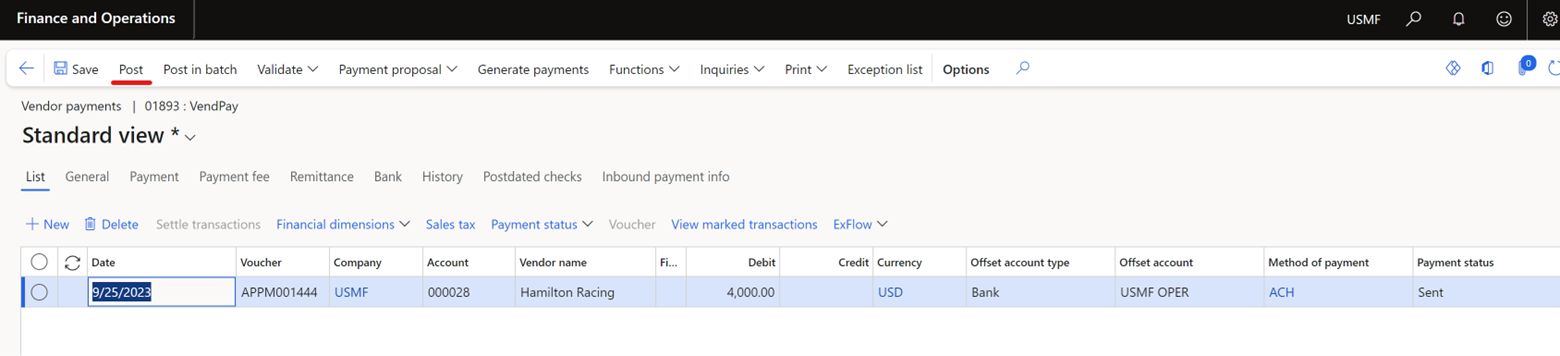
- Click Post.
Please note that if there is a workflow approval process enabled, the payment journal must be approved before the system will allow you to post the journal.
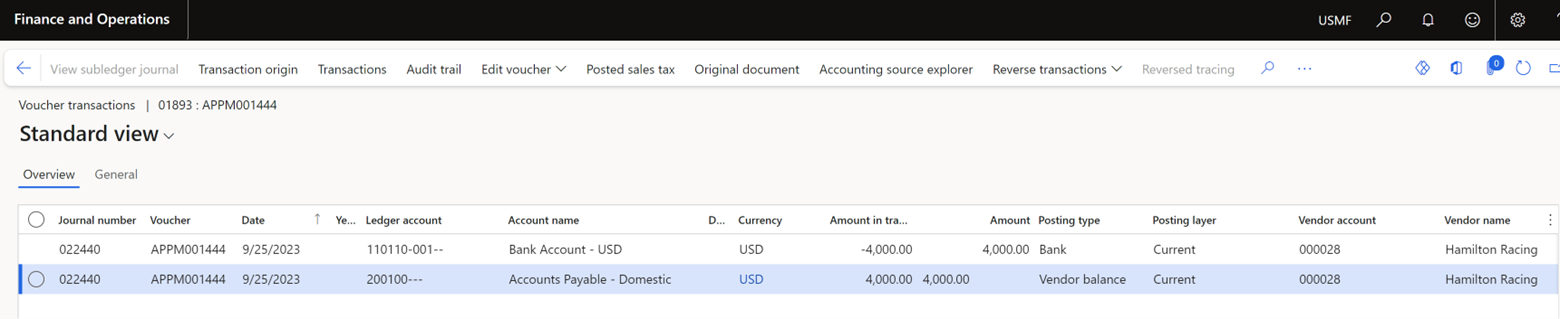
Please see below the voucher generated for the payment journal once it has been posted. A credit is posted to the Bank account, and a debit is posted to the Vendor Payable account settling the invoice.
- If you go back to the Open Prepayments form, you will notice that the USD $4,000 amount has moved from the “Unpaid prepayment amount” to “Unposted paid amount.” This indicates that the payment has been posted but the value has not been applied to received goods or services.
Invoicing and applying prepayment to received goods or services
Procurement and sourcing > Purchase orders > All purchase orders
- Select the PO which requires invoicing.
- Select Invoice on the Action Pane. Click Generate > Invoice
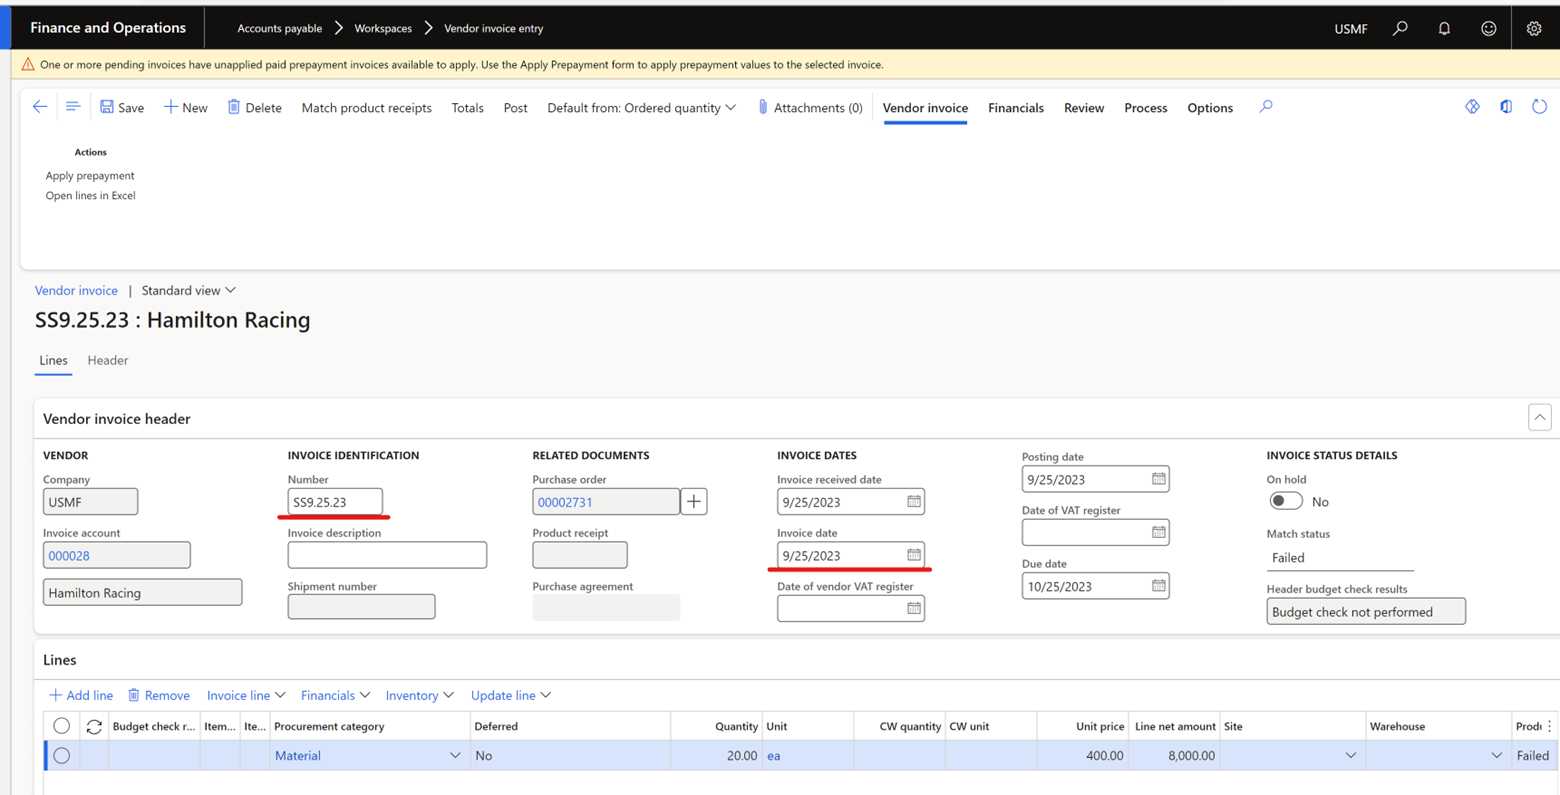
- On the invoice, enter the Invoice Number and Invoice Date.
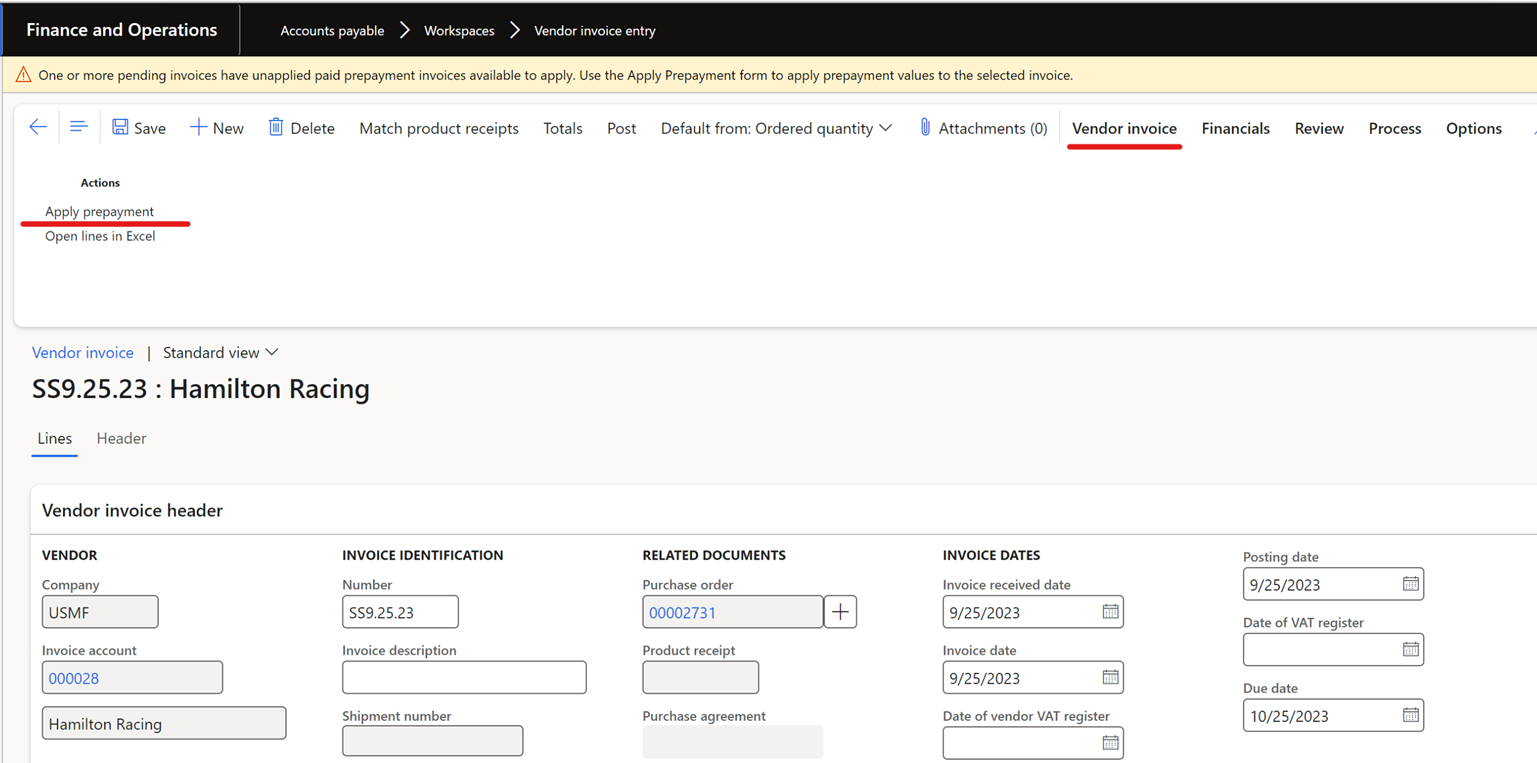
As you may notice in the yellow flag below, the system is alerting you that there are one or more prepayment invoices available to apply. We will go through this process in more detail in the next steps.
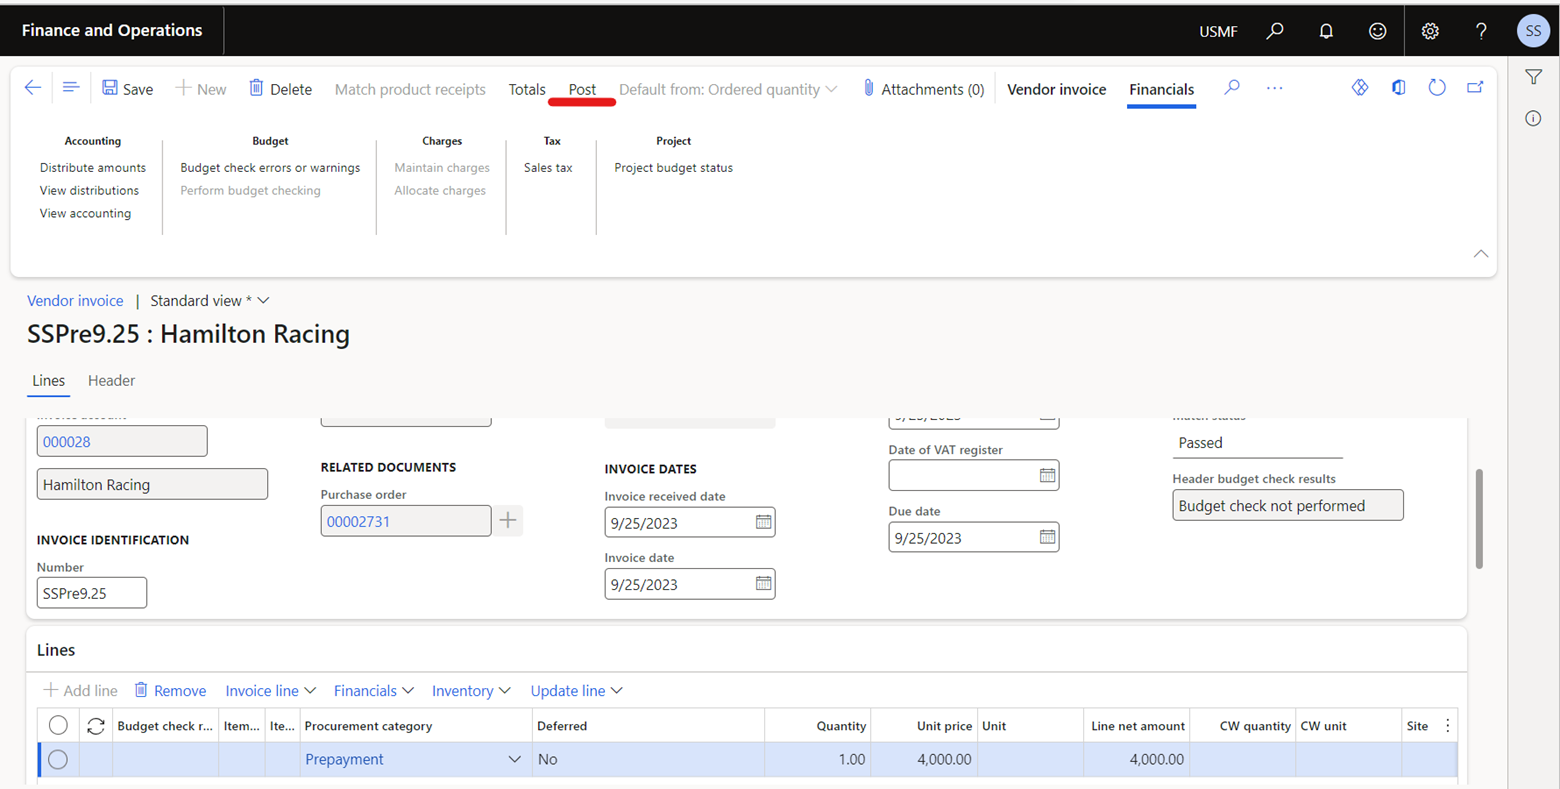
- On the Action Pane, click Vendor invoice, then click Apply prepayment.
- Select the prepayment invoice you would like to apply. Then, click Apply Prepayment.
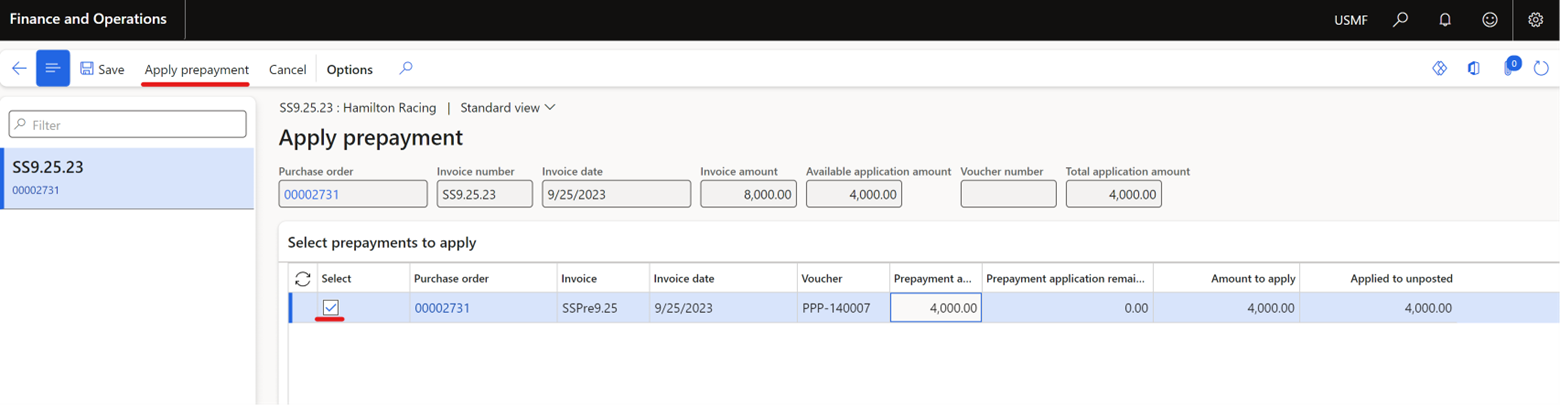
- As you see in the screenshot below, the Prepayment invoice of USD $4,000 is applied as a credit to the Vendor invoice.
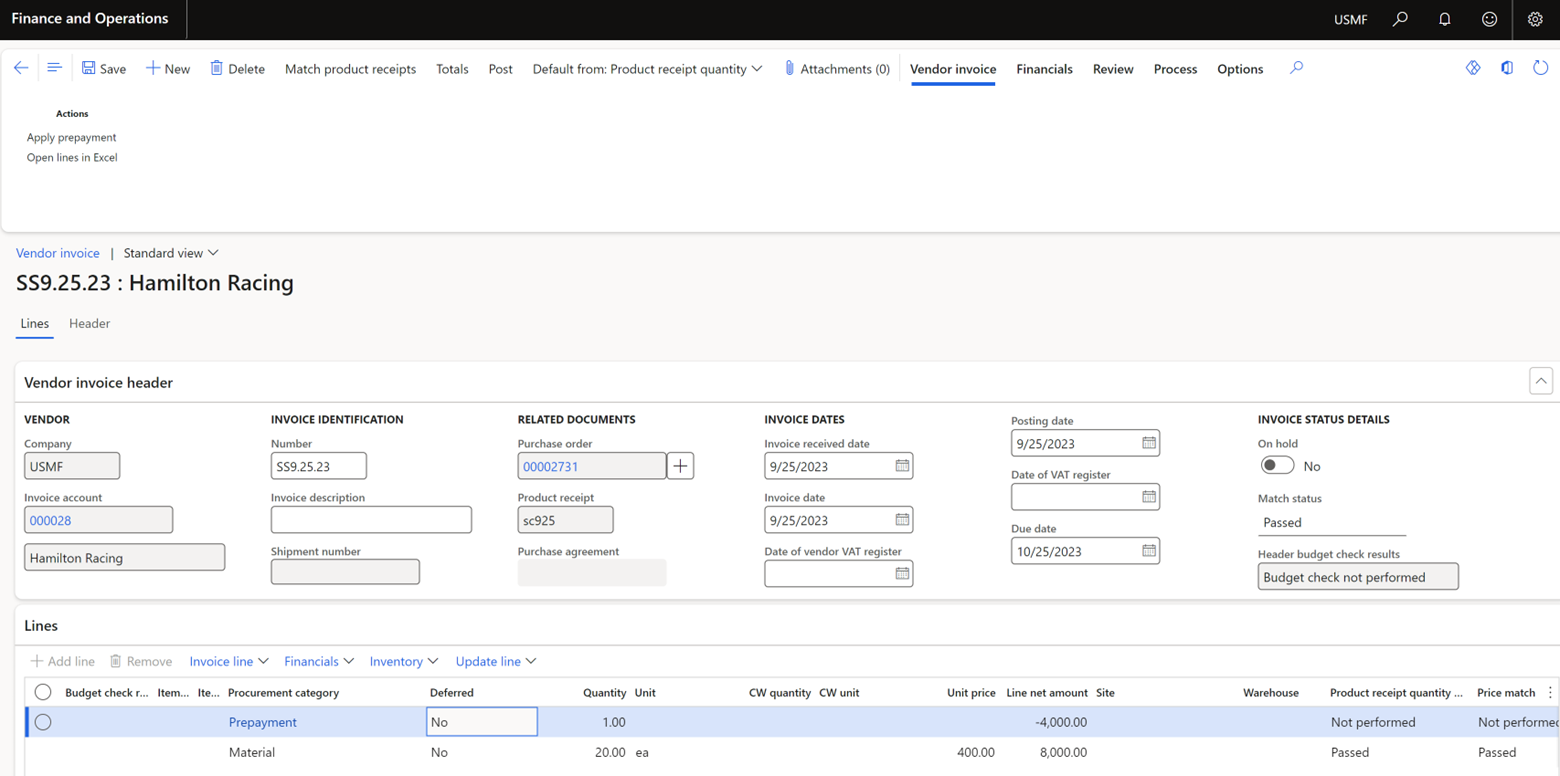
Please note that with the original line of USD $8,000 being posted as opposed to only the USD $4,000 due, the system is ensuring that the entirety of this value is accounted for in the correct expense account.
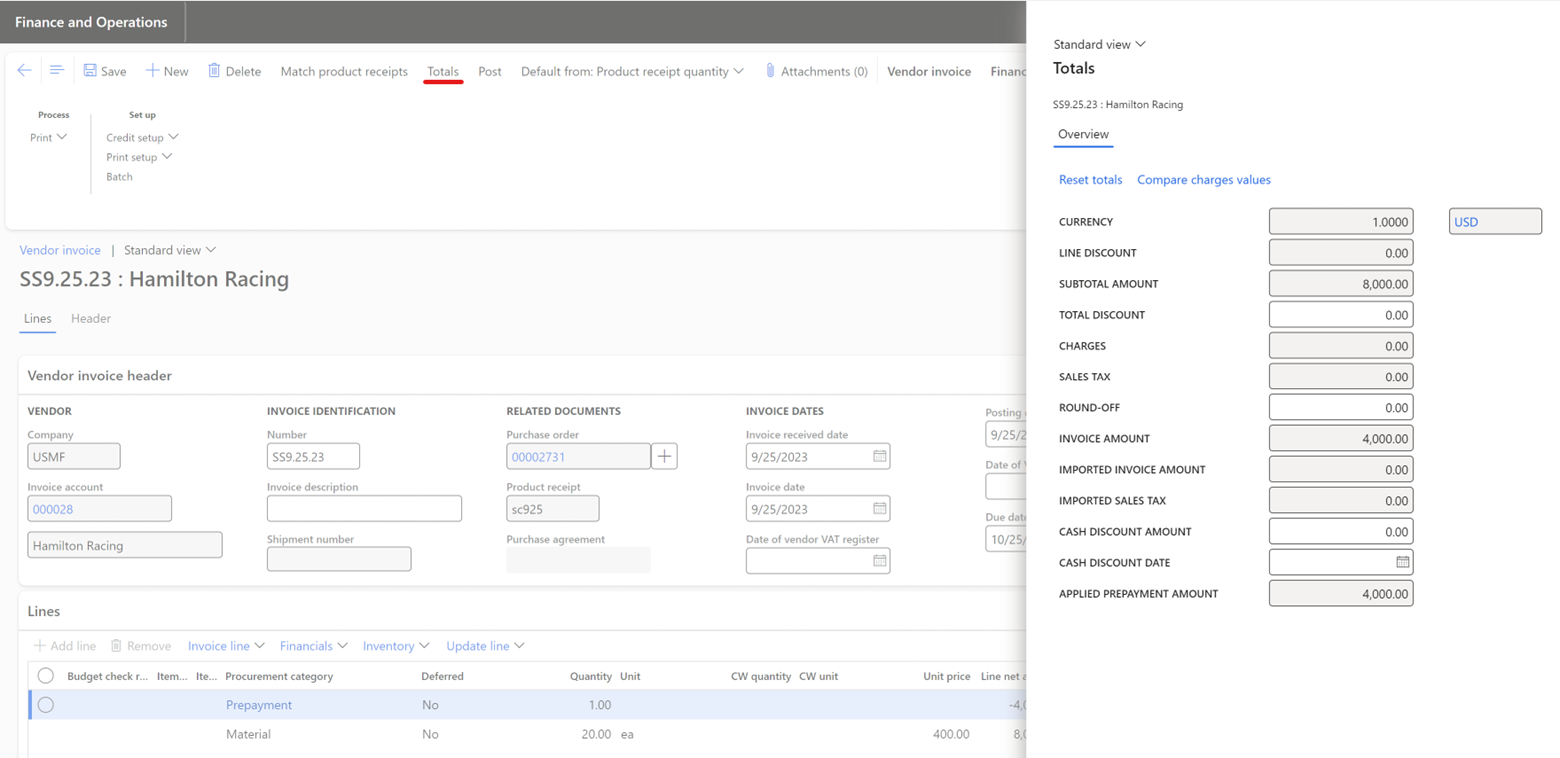
If you click on Totals in the Action pane, you will see a more granular breakdown of the invoice transactions.
- Click Post.
Please note that if there is a workflow approval process enabled, the invoice must be approved before the system will allow you to post the invoice.
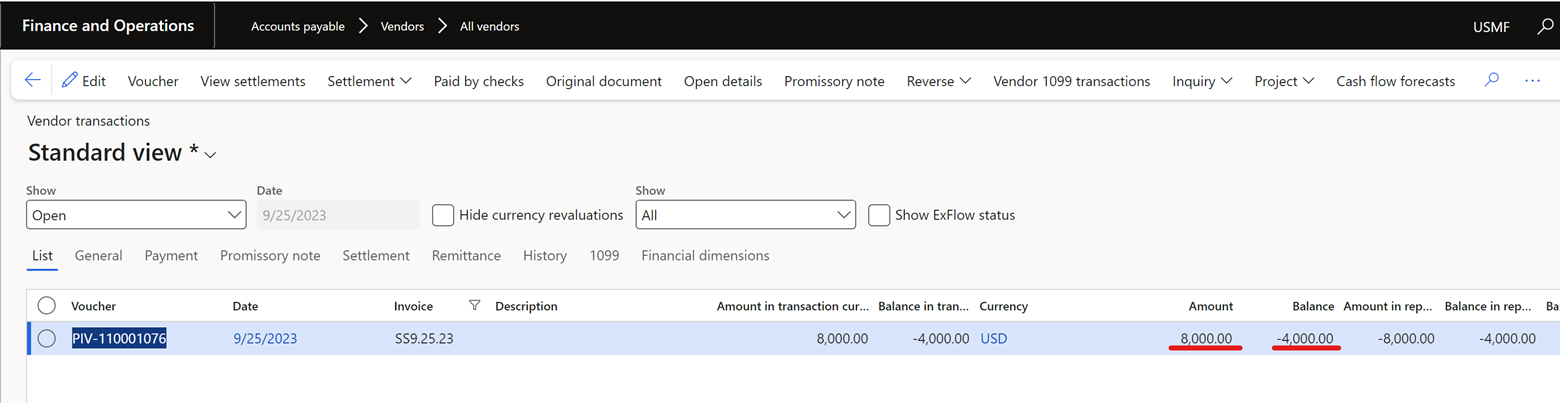
If we look at the Open vendor transactions below, you’ll notice that the invoice amount was posted for USD $8,000. The outstanding balance however is only of USD $4,000.00 because of the applied prepayment.
If we go back to the Open Prepayments form, you’ll notice the record for this prepayment is no longer present as it has gone through the whole cycle and no further action is required from an invoicing standpoint.
- The vendor invoice can then be picked up in a payment run and paid as any other invoice, and the cycle will be complete.
Have any questions about the Purchase Order prepayments process in D365? Feel free to reach out to our experts at any time!
Note: As of release 10.0.28, we are able to create prepayment invoice journals that are not related to a PO. Stay tuned to our upcoming blogs to learn more about this process!
This publication contains general information only and Sikich is not, by means of this publication, rendering accounting, business, financial, investment, legal, tax, or any other professional advice or services. This publication is not a substitute for such professional advice or services, nor should you use it as a basis for any decision, action or omission that may affect you or your business. Before making any decision, taking any action or omitting an action that may affect you or your business, you should consult a qualified professional advisor. In addition, this publication may contain certain content generated by an artificial intelligence (AI) language model. You acknowledge that Sikich shall not be responsible for any loss sustained by you or any person who relies on this publication.