


Windows Hello for Business is a modern, secure authentication method that allows users to sign into their devices using biometrics, PINs, or other forms of authentication. It’s an excellent option for businesses looking to enhance security while providing a seamless sign-in experience for their users. Entra ID (formerly known as Azure Active Directory or Azure AD) integration enables streamlined deployment and management of Windows Hello for Business. An issue that some of my clients have run into when trying to deploy Windows Hello for Business is that when they enable Windows Hello for Business, it forces registration. What most of my clients ask for is to make Windows Hello for Business optional for users. This is ideal, as not every computer has a compatible biometric component. Also, a common scenario is only a subset of users want to utilize Windows Hello for Business, while others have no desire. In this blog, we’ll walk through how to make Windows Hello for Business optional on Entra joined computers.
Prerequisites
- Microsoft Entra ID: You need an active Entra ID instance associated with your organization. Computers must be Microsoft Entra joined and managed by Intune. The below configuration will not work with Microsoft Entra hybrid joined PCs (formerly known as Hybrid-Azure AD joined PCs).
- Windows 10 Pro or Enterprise Edition: Windows Hello for Business is available on Windows 10 Pro and Enterprise editions.
- Microsoft Entra ID P1 or P2 subscription: This subscription is required to configure and manage Windows Hello for Business.
- Compatible biometric components (fingerprint or camera). The Windows 10 and 11 Hello Facial Recognition feature requires an Intel RealSense or 3D Camera to support facial unlock features. On many computers, IR or 3D capable cameras are an OPTIONAL item. If this option is not selected during the order process, then the computer will not be Windows Hello compliant.
There is a tenant-wide Windows Hello for Business policy that forces users to register at the time the PC is enrolled. This is a good option if you utilize Autopilot in your organization. We will not utilize this option, but below is a description of the available configurations.
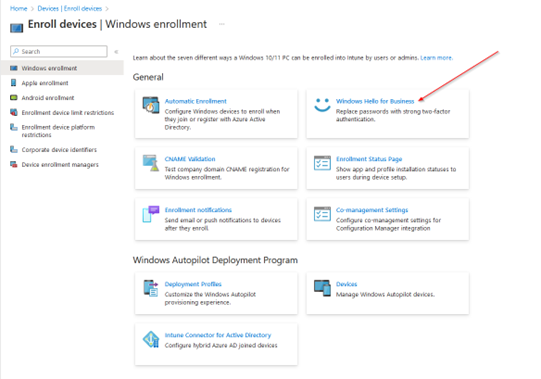
The tenant-wide policy has three options:
- Enabled. Select this setting if you want to configure Windows Hello for Business settings. When you select Enabled, other settings for Windows Hello are visible and can be configured for devices.
- Disabled. If you don’t want to enable Windows Hello for Business during device enrollment, select this option. When disabled, users can’t provision Windows Hello for Business. When set to Disabled, you can still configure the subsequent settings for Windows Hello for Business even though this policy won’t enable Windows Hello for Business.
- Not configured. Select this setting if you don’t want to use Intune to control Windows Hello for Business settings. Any existing Windows Hello for Business settings on 10/11 devices aren’t changed. All other settings on the pane are unavailable.
Steps to Make Windows Hello for Business Optional on Microsoft Entra Joined Computers
To enable Windows Hello for Business, make it optional, and enable biometrics we’ll be utilizing a Windows Command Script bundled into a Win32App.
What we’ll do is create a install.cmd file and save the following lines of text:
reg add “HKEY_LOCAL_MACHINESOFTWAREPoliciesMicrosoftPassportForWork” /v Enabled /t REG_DWORD /d 1 /f
reg add “HKEY_LOCAL_MACHINESOFTWAREPoliciesMicrosoftPassportForWork” /v DisablePostLogonProvisioning /t REG_DWORD /d 1 /f
reg add “HKEY_LOCAL_MACHINESOFTWAREPoliciesMicrosoftBiometrics” /v Enabled /t REG_DWORD /d 1 /f
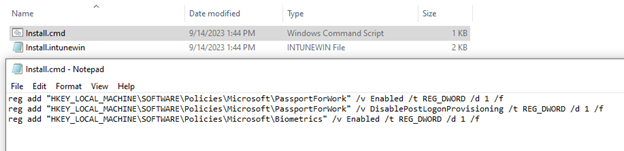
The first registry key enables Windows Hello for Business. The second registry key disables registration on login, which makes Windows Hello for Business optional. The third registry key enables Biometrics.
Once you have the Install.cmd, you’ll use the IntuneWinAppUtil.exe to bundle it into an intune.win file. The steps for that procedure can be found here: https://learn.microsoft.com/en-us/mem/intune/apps/apps-win32-prepare
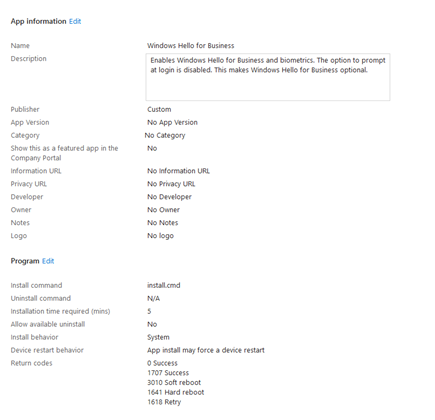
Once we have our intune.win file we can go to Endpoint Manager Admin Center > Apps > Windows > Add > Windows app (Win32) > upload our Intune.win app.
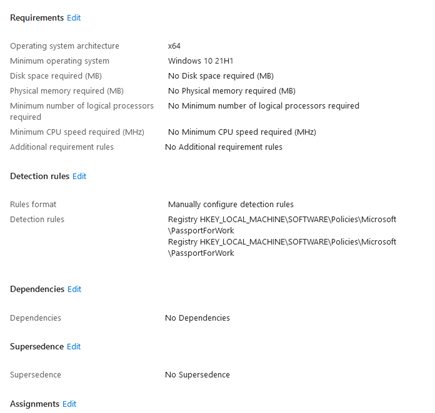
The below screenshots show the remaining configuration options:
For Assignments I’m targeting a dynamic group that contains all Entra joined PCs. This example environment has a mixture of Entra joined and Entra hybrid joined computers, so a dynamic group is the most appropriate choice.
Here is the rule syntax that is configured for the dynamic group:
(device.deviceTrustType -eq “AzureAD”)
As always, I do recommend testing this on a few pilot computers before you roll it out to your entire organization. You may choose to limit this to a static group to control instead of dynamic.
Wait a day or so for the policy to push and then on the user’s computer: Settings > Accounts > Sign-in options > Windows Hello Pin, Windows Hello Face, Windows Hello Fingerprint will be available.
Conclusion
Enabling Windows Hello for Business on Microsoft Entra joined computers enhances security and provides a convenient sign-in experience for users. By leveraging biometrics or PINs organizations can achieve a balance between security and usability. Following this step-by-step guide will help you configure and deploy Windows Hello for Business effectively within your Entra ID environment. Make sure to adapt the configurations to suit your specific organizational needs and security policies. Stay secure and embrace modern authentication methods for a safer computing environment.
This publication contains general information only and Sikich is not, by means of this publication, rendering accounting, business, financial, investment, legal, tax, or any other professional advice or services. This publication is not a substitute for such professional advice or services, nor should you use it as a basis for any decision, action or omission that may affect you or your business. Before making any decision, taking any action or omitting an action that may affect you or your business, you should consult a qualified professional advisor. In addition, this publication may contain certain content generated by an artificial intelligence (AI) language model. You acknowledge that Sikich shall not be responsible for any loss sustained by you or any person who relies on this publication.