


In network administration, gathering configuration details from switches is a routine but critical task. Whether you’re auditing a device, troubleshooting an issue, or preparing for a migration, having a complete snapshot of the switch’s current state is essential. One of the most efficient ways to capture switch configuration details is by using PuTTY, a lightweight and reliable SSH/Telnet client.
This blog outlines a streamlined approach to using PuTTY for capturing switch configuration details. By following these steps, you can ensure that your session is logged properly and that all relevant commands are executed in a single pass.
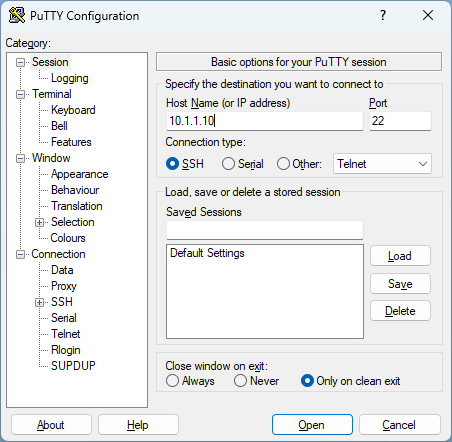
Step 1 – Launch PuTTY and Enter the Switch IP Address
Start by opening PuTTY. In the Session category, enter the IP address of the switch you want to connect to in the Host Name (or IP address) field. Ensure the connection type is set to SSH (or Telnet, depending on your switch configuration).
This establishes the basic connection parameters.
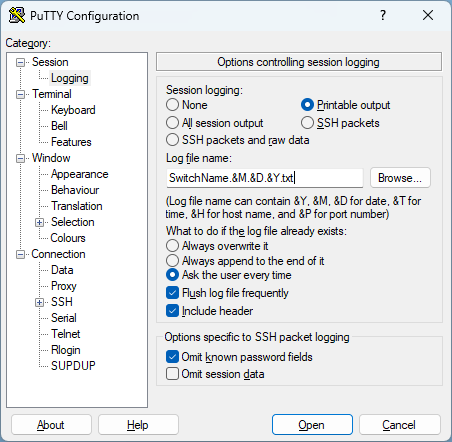
Step 2 – Enable Session Logging
Before initiating the connection, configure PuTTY to log your session output. This is crucial for capturing the switch’s responses to your commands.
- In the left-hand tree menu, expand the Session category.
- Click on Logging.
- Change the Session logging option from None to Printable output.
- Specify a log file name and location. I prefer using the format SwitchName.&M.&D.&Y.txt.
Using the variables &M, &D and &Y automatically enter the correct date on the filename. This setting ensures that all readable output from the switch is saved to a file, which can be reviewed or archived later.
Step 3 – Open the Connection and Sign In
Click Open to initiate the session. A terminal window will appear. Log in using your credentials.
Tip: Maximize the PuTTY window before proceeding. This helps avoid line wrapping issues and ensures that the output is captured cleanly in the log file.
Step 4 – Paste the Command Set
To efficiently gather all relevant configuration and status information, prepare a set of commands in your clipboard. Once logged in, simply right-click inside the PuTTY window to paste the entire set.
Here’s a recommended command list:
terminal length 0
more system:running-config
show ver
show hardware
show license summary
show license all
show switch
show etherchannel summary
show etherchannel detail
show clock
show access-lists
show vlan
show vlan brief
show vtp status
show cdp neighbors
show cdp neighbors detail
show int trunk
show inventory
show ip int brief
show ip route
show mac address-table
show tech-support
Let’s break down why these commands are useful:
- terminal length 0: Prevents paginated output, ensuring full command results are displayed without interruption.
- more system:running-config: Displays the active configuration.
- show ver, show hardware, show inventory: Provide hardware and software version details.
- show license summary, show license all: Reveal licensing status.
- show switch, show etherchannel summary/detail: Show switch stack and link aggregation details.
- show clock: Confirms system time.
- show access-lists, show vlan, show vlan brief: Display security and VLAN configurations.
- show vtp status: Indicates VTP mode and domain.
- show cdp neighbors/detail: Lists connected Cisco devices.
- show int trunk, show ip int brief, show ip route: Provide interface and routing information.
- show mac address-table: Displays MAC address mappings.
- show tech-support: A comprehensive diagnostic output useful for deeper troubleshooting.
Step 5 – Monitor and Confirm Completion
Once the commands are pasted, PuTTY will execute them sequentially. You can monitor the output in real time. When the switch returns to the command prompt and is ready for new input, the session has completed.
At this point, your log file contains all the output from the commands. You can close the session or continue working interactively.
Best Practices and Considerations
- Use consistent naming for log files: Include the switch name and date for easy reference.
- Review logs for anomalies: Look for unexpected configurations or errors.
- Secure your logs: Configuration files may contain sensitive information. Store them securely and restrict access.
Conclusion
Using PuTTY to capture switch configuration details is a simple yet powerful method for network documentation and troubleshooting. By enabling logging and executing a comprehensive command set, you can gather all necessary information in one efficient session.
This approach minimizes manual effort, reduces the chance of missing critical data, and provides a reliable record for future reference. Whether you’re preparing for a network upgrade or conducting routine audits, this method ensures you have the insights needed to make informed decisions.
Have any questions about using PuTTY for switch configuration details? Please reach out to our team of experts at any time!
This publication contains general information only and Sikich is not, by means of this publication, rendering accounting, business, financial, investment, legal, tax, or any other professional advice or services. This publication is not a substitute for such professional advice or services, nor should you use it as a basis for any decision, action or omission that may affect you or your business. Before making any decision, taking any action or omitting an action that may affect you or your business, you should consult a qualified professional advisor. In addition, this publication may contain certain content generated by an artificial intelligence (AI) language model. You acknowledge that Sikich shall not be responsible for any loss sustained by you or any person who relies on this publication.