


Microsoft Dynamics 365 for Finance and Supply Chain Management has multiple ways to stand up environments. One of the common and cost-effective methods is to use a Cloud Hosted Environment (Tier 1 or CHE). These environments are tied to your Azure subscription. One of the main differences between CHE and Sandbox environments (Tier 2, PROD, UAT, etc.), is that the CHE lives within our Azure vs Microsoft. Due to this, customers are responsible for the upkeep of these environments if they are utilized.
Microsoft recently announced that one of the components of all cloud hosted environments, the Basic Load Balancer, will be retired September 30, 2025. All currently deployed CHEs will continue to work until this date. Since March 28, 2025, all new CHEs are deployed using Standard SKUs instead of Basic SKUs. This will enhance the performance and reliability of the cloud infrastructure.
Currently deployed CHEs can be migrated to use the updated Standard Load Balancer via the following process. If they are not migrated, they will cease to work from September 30, 2025.
How to Migrate CHE Load Balancer from Basic to Standard
To get started we need the following:
- Elevated PowerShell Access (Admin mode)
- Azure CLI Access
- Powershell Az.Account login capabilities
- Azure Permissions to update Load Balancer
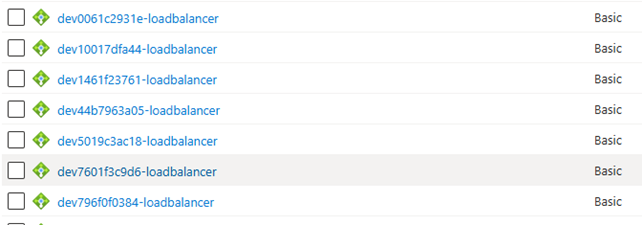
Let’s first start by navigating to Azure Portal to review our list of Load Balancers. I recommend either copying the list of names out or having the list available while running the scripts.
Azure Portal → Load Balancers
Next, we will want to open our PowerShell window.
First, let’s confirm the installation of the Az Module. Please note that AzureRM has been retired and the new module is Az. Please review the following link if you need to upgrade scripts or general information: https://learn.microsoft.com/en-us/powershell/azure/migrate-from-azurerm-to-az?view=azps-13.4.0
In my instance, I ran:
Uninstall-Module -name AzureRmInstall-Module -name Az
Once installed, run. You may be required to select the subscription you need to work with:
Connect-AzAccount

Due to the upgrade from AzureRM to AZ, there may be issues with multi-factor authentication. You can rectify this by disabling WAM. By doing so, this will force Powershell when connecting to utilize a web browser to authenticate. Run the following and then attempt reconnecting.
Update-AzConfig -EnableLoginByWam $false
Depending on your setup, you may need to include additional parameters to target the specific resources. In my instance, I had to include the tenant and subscription I was working with to sign in properly.
Connect-AzAccount -Tenat TenantID -Subscription SubscriptionID
Once connected we can begin the process of converting the load balancer.
To ensure we are working against the correct subscription in our window and for the Az module, please run:
Select-AzSubscription -Subscription $subscriptionId
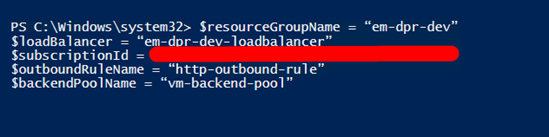
Inside of Powershell, run the following to set a handful of variables. Replace the values with respective values to your environment, 4 and 5 can be left alone or updated. Use desired value for all load balancers that need to be migrated.
$resourceGroupName = “Resourcegroup-name”$loadBalancer = “Loadbalancer-name”$subscriptionId = “Subscription-Id”$outboundRuleName = “http-outbound-rule”$backendPoolName = “vm-backend-pool”
Once completed, we can begin the migration process. This will take a few minutes.
Install-Module -Name AzureBasicLoadBalancerUpgrade -Scope CurrentUser -Repository PSGallery -ForceStart-AzBasicLoadBalancerUpgrade -ResourceGroupName $resourceGroupName -BasicLoadBalancerName $loadBalancerName

After migration, it is important to note the following (see last messages in above screenshot):
- Basic Load Balancer SKU’s support outbound traffic by default
- Standard Load Balancer SKU’s do not automatically permit outbound access for pool members
Ensure Functionality After Migration
To ensure the functionality is available, we need to run a few more commands.
First, we will assign a few new variables:
$loadBalancer = Get-AzLoadBalancer -ResourceGroupName $resourceGroupName -Name $loadBalancerName$backendPool = New-AzLoadBalancerBackendAddressPoolConfig -Name $backendPoolName

We then need to connect the backend pool with the Network Interface (NIC). To add the backend pool to the load balancer, run the following:
$nic = Get-AzNetworkInterface -ResourceGroupName $resourceGroupName
$ipConfig = $nic.IpConfigurations | Where-Object { $_.PrivateIpAddress -ne $null }
$ipConfig.LoadBalancerBackendAddressPools.Add($backendPool)

Finally add the backend pool to the load balancer. Set the following variables:
$loadBalancer.BackendAddressPools.Add($backendPool)
$frontendIPConfig = $loadBalancer.FrontendIpConfigurations
$outboundRule = New-AzLoadBalancerOutboundRuleConfig -Name $outboundRuleName -BackendAddressPool $backendPool -FrontendIpConfiguration $frontendIPConfig -Protocol All -IdleTimeoutInMinutes 4 -AllocatedOutboundPort 1000
$loadBalancer.OutboundRules.Add($outboundRule)
Now you can run the following to set the NIC against the Load Balancer.
Set-AzLoadBalancer -LoadBalancer $loadBalancer
Set-AzNetworkInterface -NetworkInterface $nic
Once completed, review the Load Balancers form to ensure that it is no longer basic. Ensure outbound access is available to the virtual machine as well.

Have any questions about how to migrate your CHE Load Balancer to the Standard Load Balancer in Microsoft Dynamics 365 F&SCM? Please reach out to our experts at any time!
This publication contains general information only and Sikich is not, by means of this publication, rendering accounting, business, financial, investment, legal, tax, or any other professional advice or services. This publication is not a substitute for such professional advice or services, nor should you use it as a basis for any decision, action or omission that may affect you or your business. Before making any decision, taking any action or omitting an action that may affect you or your business, you should consult a qualified professional advisor. In addition, this publication may contain certain content generated by an artificial intelligence (AI) language model. You acknowledge that Sikich shall not be responsible for any loss sustained by you or any person who relies on this publication.